
Users Guide


• To accept the default installation path, choose Typical installation and click Next.
• To enable specic program features and change the installation path, select Custom installation and click Next. In Custom
Setup, select the License Manager features that you require; check for disk space, assign a new location for installing
License Manager.
7. In the Ready to Install screen, click Install.
8. After the installation is complete, click Finish.
Upgrading OpenManage Essentials
You can upgrade from OpenManage Essentials version 2.1 and later to OpenManage Essentials version 2.5.
Before you upgrade, ensure that the minimum available free space on the hard drive is about 10 GB.
NOTE: OpenManage Essentials 2.5 use TLS version 1.2 to support Feature Usage Settings and the following features of
MX7000 chassis—discovery, system update, device conguration template creation and deployment, and remediation.
For more information about the best practices to be followed to secure .NET framework applications that use the TLS
protocol on the management station, see
www.docs.microsoft.com/en-us/dotnet/framework/network-programming/tls.
To upgrade:
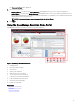
1. Double-click the OpenManage Essentials executable le.
The Dell OpenManage Install screen is displayed. The following options are available:
• Dell EMC OpenManage Essentials — Select this option to install OpenManage Essentials, and Troubleshooting Tool.
• Dell EMC Repository Manager — Select this option to install Repository Manager. Using Repository Manager, you can
create customized bundles and repositories of Update Packages, software utilities such as update drivers, rmware, BIOS,
and other applications.
• Dell EMC License Manager — Select this option to install License Manager. The License Manager is a one-to-many license
deployment and reporting tool for the integrated Dell Remote Access Controller (iDRAC), Chassis Management Controller
(CMC), OpenManage Essentials, and PowerEdge storage sled licenses.
• Dell EMC SupportAssist Enterprise — Select this option to install SupportAssist Enterprise. The SupportAssist Enterprise
provides proactive support capabilities for supported server, storage, and networking solutions.
NOTE: If SupportAssist Enterprise is already installed on the system, by default, the Dell EMC SupportAssist
Enterprise option is selected and disabled. After the upgrade of OpenManage Essentials, SupportAssist
Enterprise is also upgraded. If applicable, you may be required to provide the proxy settings during the upgrade
of SupportAssist Enterprise. For more information, see the
Dell EMC SupportAssist User’s Guide
at
www.dell.com/ServiceabilityTools.
• Documentation — Click to view the online help.
• View Readme — Click to view the readme le. To view the latest readme, go to DellTechCenter.com/OME.
2. In the OpenManage Install screen, select Dell EMC OpenManage Essentials and click Install.
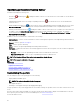
The OpenManage Essentials Prerequisites window, displays the following requirement types:
• Critical — This error condition prevents the installation of a feature.
• Warning — This warning condition may disable the Typical installation but not an Upgrade of the feature later during
installation.
• Information — This informational condition does not aect the Typical installation of a feature.
NOTE: If OpenManage Essentials version 1.1 is installed on the system on a local database using SQL Server 2008
Express edition, and an OpenManage Essentials-specic named instance SQLEXPRESSOME is not available, the
SQL Server prerequisites displays a Critical icon. To proceed with the installation, you must install SQL Server
Express 2012 SP1 with the SQLEXPRESSOME instance. Data from the earlier version of SQL Server is migrated
automatically.
3. Click Install Essentials.
4. In the install wizard for OpenManage Essentials, click Next.
5. In the License Agreement page, read the license agreement, select I accept the terms in the license agreement, and then
click Next.
6. If applicable, provide the Package Server Port and the Task Manager Service Port. If either the package server port or task
manager service port is blocked during an upgrade, provide a new port. Click
Next.
33