
Users Guide


NOTE: The users you add to the OpenManage Essentials user group must also belong to the built-in local Administrator
group. For information on adding a Windows user account to a group, see “Adding a user account to a group” at
support.microsoft.com
1. Open Server Manager.
2. Click Tools → Computer Management.
3. In the left pane, click Local Users and Groups → Groups.
4. In the right-pane, right-click OmeAdministrators and select Add to Group.
5. In the OmeAdministrator Properties window, click Add.
The Select Users window is displayed.
6. In the Enter the object names to select eld, type the user name.
7. Click Check Names and then click OK.
The user name is displayed in the Members list within the OmeAdministrator Properties window.
8. Click OK.
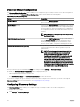
Enabling SQL Server and Windows Authentication Mode in SQL Server
To enable SQL Server and Windows authentication mode:
1. Open SQL Server Management Studio.
2. In Obejct Explorer, right-click the top-level SQL Server object and click Properties.
The Server Properties window is displayed.
3. In the left pane, click Security.
4. In the right pane, under Server authentication, click SQL Server and Windows Authentication mode.
5. Click OK.
6. In Obejct Explorer, right-click the top-level SQL Server object and click Restart.
Verifying SQL Server TCP or IP Status
To verify the TCP/IP status of SQL Server:
1. Click Start → All Programs → SQL Server Conguration Manager
NOTE: If multiple versions of SQL Server Conguration Manager are installed, ensure that you select the latest
version.
2. On the left pane, click to expand SQL SQL Native Client 11.0 Conguration.
3. Click Client Protocols.
4. On the right pane, ensure that the status of TCP/IP is Enabled.
5. If TCP/IP is not enabled, right-click TCP/IP and select Enable.
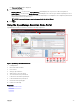
Installing SupportAssist Enterprise
SupportAssist Enterprise integrates with OpenManage Essentials to provide proactive support capabilities for enterprise server,
storage, and networking solutions using the existing environment data. SupportAssist collects information from supported devices,
and automatically creates support cases when issues arise. This helps Dell EMC to provide you an enhanced, personalized, and
ecient support experience.
To install SupportAssist:
NOTE: Before you begin, make sure that:
• The system is able to connect to the Internet.
• You have the Administrator rights on the system.
• On the rewall, port 443 is open to access https://ftp.dell.com.
31