
Users Guide


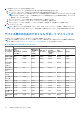


Table Of Contents
- Dell EMC OpenManage Enterpriseバージョン3.5ユーザーズ ガイド
- 目次
- 表
- Dell EMC OpenManage Enterprise について
- OpenManage Enterprise 内のセキュリティ機能
- OpenManage Enterpriseのインストール
- OpenManage Enterpriseをお使いになる前に
- OpenManage Enterpriseグラフィカル ユーザー インターフェイスの概要
- OpenManage Enterprise ホームポータル
- デバイスの管理
- デバイスのグループ化
- 静的デバイスグループの作成または削除
- クエリデバイスグループの作成または編集
- 静的子グループのデバイスの追加または編集
- 静的またはクエリ動的グループの子グループの名前の変更
- 静的またはクエリグループのクローン作成
- 新しいグループへのデバイスの追加
- 既存グループへのデバイスの追加
- OpenManage Enterprise からのデバイスの削除
- OpenManage Enterprise からのデバイスの除外
- ベースラインを使用したデバイス ファームウェア/ドライバーのアップデート
- 個々のデバイスのファームウェア バージョンのロールバック
- デバイスインベントリの更新
- デバイスステータスの更新
- 1 台のデバイスのインベントリのエクスポート
- デバイスリスト
- シャーシとサーバにおける追加アクションの実行
- MX7000 シャーシに対して表示されるハードウェア情報
- すべてまたは選択したデータのエクスポート
- デバイスの表示と設定
- デバイスの管理アプリケーション iDRAC の開始
- 仮想コンソールの起動
- デバイスのグループ化
- デバイスのファームウェアおよびドライバーの管理
- デバイス導入テンプレートの管理
- リファレンス デバイスからの導入テンプレートの作成
- テンプレート ファイルのインポートによる導入テンプレートの作成
- 導入テンプレート情報の表示
- サーバー導入テンプレートの編集
- シャーシ導入テンプレートの編集
- IOA導入テンプレートの編集
- 導入テンプレートのネットワーク プロパティの編集
- デバイス導入テンプレートの導入
- IOA導入テンプレートの導入
- 導入テンプレートのクローン作成
- 未検出のサーバーまたはシャーシへの設定の自動導入
- 自動導入のターゲットの作成
- 自動導入のターゲットを削除
- 自動導入のターゲットの詳細の別形式へのエクスポート
- ステートレスな導入の概要
- ネットワークの定義
- 設定済みネットワークの編集または削除
- VLAN定義のエクスポート
- ネットワーク定義のインポート
- プロファイルの管理
- デバイス設定コンプライアンスの管理
- デバイスのアラートの監視
- 監査ログの管理
- デバイスコントロール用ジョブの使い方
- 監視または管理のためのデバイスの検出
- Discover servers automatically by using the server-initiated discovery feature
- デバイス検出ジョブの作成
- デバイス検出のためのプロトコル サポート マトリックス
- デバイス検出ジョブの詳細の表示
- デバイス検出ジョブの編集
- デバイス検出ジョブの実行
- デバイス検出ジョブの停止
- .csv ファイルからデータをインポートして複数のデバイスを指定
- デバイスをグローバルに除外する
- サーバ検出ジョブを作成するための検出モードの指定
- サーバー用にカスタマイズされたデバイス検出ジョブ プロトコルの作成 - 検出プロトコルの追加設定
- シャーシ検出ジョブを作成する検出モードの指定
- シャーシ用にカスタマイズされたデバイス検出ジョブ プロトコルの作成 - 検出プロトコルの追加設定
- Dellストレージ検出ジョブを作成するための検出モードの指定
- ネットワーク スイッチ検出ジョブを作成するための検出モードの指定
- HTTPSストレージ デバイス用にカスタマイズされたデバイス検出ジョブ プロトコルの作成 - 検出プロトコルの詳細設定
- SNMP デバイス用のカスタマイズしたデバイス検出ジョブプロトコルの作成
- 複数のプロトコル検出ジョブを作成する検出モードの指定
- デバイス検出ジョブの削除
- デバイスインベントリの管理
- デバイス保証の管理
- レポート
- MIB ファイルの管理
- OpenManage Enterprise アプライアンス設定の管理
- OpenManage Enterprise のネットワーク設定
- OpenManage Enterprise ユーザーの管理
- ユーザーセッションの終了
- OpenManage Enterprise でのディレクトリサービスの統合
- OpenID Connectプロバイダーを使用したOpenManage Enterpriseログイン
- OpenManage EnterpriseへのOpenID Connectプロバイダーの追加
- OpenManage Enterpriseへのロール ベースのアクセスのためのPingFederateでのOpenID Connectプロバイダー ポリシーの設定
- OpenManage Enterpriseへのロール ベースのアクセスのためのKeycloakでのOpenID Connectプロバイダー ポリシーの設定
- OpenID Connectプロバイダーを使用したOpenManage Enterpriseの登録ステータスのテスト
- OpenManage EnterpriseでのOpenID Connectプロバイダーの詳細の編集
- OpenID Connectプロバイダーの有効化
- OpenID Connectプロバイダーの削除
- OpenID Connectプロバイダーの無効化
- セキュリティ証明書
- ログインセキュリティのプロパティの設定
- コンソールプリファレンスの管理
- アラート表示のカスタマイズ
- SMTP、SNMP、Syslogアラートの設定
- 着信アラートの管理
- 保証設定の管理
- OpenManage Enterpriseのバージョンと使用可能なプラグインの確認とアップデート
- リモートコマンドとスクリプトの実行
- OpenManage Mobile の設定
- その他の参照情報およびフィールドの説明

○ To add records for server-initiated discovery
>dnscmd <DnsServer> /RecordAdd example.com _dcimprovsrv._tcp PTR
ptr.dcimprovsrv._tcp.example.com
>dnscmd <DnsServer> /RecordAdd example.com ptr.dcimprovsrv._tcp TXT URI=/api/
DiscoveryConfigService/Actions/DiscoveryConfigService.SignalNodePresence
>dnscmd <DnsServer> /RecordAdd example.com ptr.dcimprovsrv._tcp SRV 0 0 443
omehost.example.com
2. By default, the Discovery-Approval policy, in the appliance, is set to Automatic and the servers that establish contact with the console
are automatically discovered. To change the settings, see コンソールプリファレンスの管理 on page 149.
3. Once the appliance is configured as mentioned in the previous steps, the servers can initiate contact with OpenManage Enterprise by
querying the DNS. The appliance verifies the servers after ensuring that the client certificate of the servers is signed by the Dell CA.
NOTE: If there are any changes in the server IP address or SSL certificate, the server reinitiates contact with OpenManage
Enterprise.
4. The Monitor > Server Initiated Discovery page lists the servers that establish contact with the console. Also, the servers whose
credentials have been added in the console, but which are yet to initiate contact are also listed. The following statuses of the servers
based on the previously mentioned conditions are displayed:
● Announced—Server initiates contact with the console, however, the credentials of the server are not added to the console.
● Credentials Added—The credentials of the server are added in the console, however, the server has not initiated contact with the
console.
● Ready to Discover—The credentials of the server are added and the server has initiated contact.
NOTE: The appliance triggers a Discovery job every 10 minutes to discover all the servers in the 'Ready to Discover' status.
However, if the Discovery-Approval policy in the appliance is set as 'Manual,' then the user should manually trigger the
Discovery job for each server. For more information, see コンソールプリファレンスの管理 on page 149
● Job submitted for Discovery—This status indicates that the discovery job is initiated either automatically or manually for the
server.
● Discovered—The server is discovered and is listed on the All Devices page.
The following tasks can be performed on the Monitor > Server Initiated Discovery page:
1. Import—To import the server credentials:
a. Click Import.
b. In the Import From File wizard, click Upload Service Tags File to navigate and select the .csv file.
To view a sample CSV file of the server credentials, click Download sample CSV file.
c. Click Finish
2. Discover—To manually discover the servers in 'Ready to Discover' status:
a. Select the servers listed on the Server-Initiated Discovery page which are in 'Ready to Discover' Status.
b. Click Discover.
A Discover job is triggered to discover the servers and post discovery these servers are listed on the All Devices page.
3. Delete—To delete the servers listed on the Server-Initiated Discovery page:
a. Select the servers on the Server-Initiated Discovery page which are already discovered and listed on the All Devices page.
b. Click Delete.
The servers are deleted from the Server-Initiated Discovery page.
NOTE: Entries corresponding to discovered servers are automatically be purged after 30 days.
4. Export—To export the server credentials in HTML, CSV, or PDF formats:
a. Select one or more servers on the Sever-Initiated Discovery page.
b. Click Export.
c. In the Export All wizard, select any of the following file formats: HTML, CSV, and PDF.
d. Click Finish. A job is created, and the data is exported to the selected location.
監視または管理のためのデバイスの検出 111