
Users Guide


Configure OpenManage Enterprise network
settings
NOTE: To perform any tasks on OpenManage Enterprise, you must have necessary user privileges. See Role-based
OpenManage Enterprise user privileges.
NOTE: If you have more than one IP for OpenManage Enterprise by using vNIC, you must use only the IPv4 address that
is indicated in the Current IP Address field (click Application Settings > Current Settings) for accessing the REST API.
1. To only view the current network settings of OpenManage Enterprise such as DNS domain name, FQDN, and IPv4 and IPv6 settings,
expand Current Settings.
2. To configure the OpenManage Enterprise current session timeout, expand Web Server Configuration and enter the session timeout
duration in minutes.
If the appliance is idle for the entered duration, the session is terminated. The current user is automatically logged out from the
appliance.
3. The current system time and the source—local time zone or NTP server IP are displayed. To configure the system time zone, date,
time, and NTP server synchronization, expand Time Configuration.
a) Select the time zone from the drop-down list.
b) Enter the date or click the Calendar icon to select the date.
c) Enter the time in hh:mm:ss format.
d) To synchronize with an NTP server, select the Use NTP check box, and enter the server address of the primary NTP server.
You can configure up to three NTP servers in OpenManage Enterprise.
NOTE: The Date and Time options are not available when the Use NTP option is selected.
e) Click Apply.
f) To reset the settings to default attributes, click Discard.
4. To configure the OpenManage Enterprise proxy settings, expand Proxy Configuration.
a) Select the Enable HTTP Proxy Settings check box to configure the HTTP proxy, and then enter HTTP proxy address and HTTP
port number.
b) Select the Enable Proxy Authentication check box to enable proxy credentials, and then enter the username and password.
c) Click Apply.
d) To reset the settings to default attributes, click Discard.
To understand all the tasks that you can perform by using the Application Settings feature, see Managing OpenManage Enterprise
appliance settings.
Manage OpenManage Enterprise users
NOTE:
To perform any tasks on OpenManage Enterprise, you must have the necessary user privileges. See Role-based
OpenManage Enterprise user privileges.
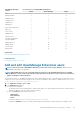
NOTE: AD and LDAP directory users can be imported and assigned one of the OpenManage Enterprise roles (Admin,
DeviceManager, or Viewer). The Single-Sign-On (SSO) feature stops at login to the console. Actions run on the devices
require a privileged account on the device.
By clicking OpenManage Enterprise > Application Settings > Users, you can:
• View, add, enable, edit, or delete the OpenManage Enterprise users.
NOTE:
You cannot enable, disable, or delete the admin/system/root users. You can change the password by clicking
Edit in the right pane.
• View details about the logged-in users, and then end (terminate) a user session.
• Manage Directory Services.
• Import and manage users from Active Directory.
By default, the list of users is displayed under Users. The right pane displays the properties of a user name that you select in the working
pane.
104
Managing OpenManage Enterprise appliance settings