
Users Guide


In the Directory Service Information dialog box, a message is displayed to indicate successful connection.
6. Click Ok.
7. Click Finish.
A job is created and run to add the requested directory in the Directory Services list.
1. In the DIRECTORY NAME column, select the directory. The Directory Service properties are displayed in the right pane.
2. Click Edit.
3. In the Connect to Directory Service dialog box, edit the data and click Finish. The data is updated and saved.
Set the login security properties
NOTE: To perform any tasks on OpenManage Enterprise, you must have necessary user privileges. See Role-based
OpenManage Enterprise user privileges on page 14.
NOTE: AD and LDAP directory users can be imported and assigned one of the OpenManage Enterprise roles (Admin,
DeviceManager, or Viewer).
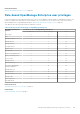
By clicking OpenManage Enterprise > Application Settings > Security, you can secure your OpenManage Enterprise either
by specifying the Restrict Allowed IP Range or the Login Lockout Policy.
● Expand Restrict Allowed IP Range:
NOTE: When "Restrict Allowed IP Range", is configured in appliance, any inbound connection to appliance, such as alert
reception, firmware update, and network identities are blocked for the devices which are outside the given range.
However, any connection that goes out of the appliance will work on all devices.
1. To specify the IP address range that must be allowed to access OpenManage Enterprise, select the Enable IP Range
check box.
2. In the IP Range Address (CIDR) box, enter the IP address range.
NOTE: Only one IP range is allowed.
3. Click Apply. To reset to default properties, click Discard.
NOTE: Apply button will not be enabled if multiple IP ranges are entered in the IP Range Address (CIDR) box.
● Expand Login Lockout Policy :
1. Select the By User Name check box to prevent a specific user name from logging in to OpenManage Enterprise.
2. Select the By IP address check box to prevent a specific IP address from logging in to OpenManage Enterprise.
3. In the Lockout Fail Count box, enter the number of unsuccessful attempts after which OpenManage Enterprise must
prevent the user from further logging in. By default, 3 attempts.
4. In the Lockout Fail Window box, enter the duration for which OpenManage Enterprise must display information about a
failed attempt.
5. In the Lockout Penalty Time box, enter the duration for which the user is prevented from making any login attempt
after multiple unsuccessful attempts.
6. Click Apply. To reset the settings to default attributes, click Discard.
Related references
Security Certificates on page 140
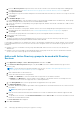
Security Certificates
By clicking Application Settings > Security > Certifciates, you can view information about the currently available SSL
certificate for the device.
NOTE:
To perform any tasks on OpenManage Enterprise, you must have necessary user privileges. See Role-based
OpenManage Enterprise user privileges on page 14.
To generate a Certificate Signing Request (CSR), see Generate and download the certificate signing request on page 141.
140
Managing OpenManage Enterprise appliance settings