
Users Guide
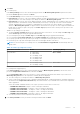
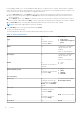
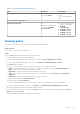
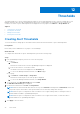
Table Of Contents
- Dell EMC OpenManage Enterprise Power Manager Version 1.1 User’s Guide
- Contents
- Introduction to Power Manager
- What's new in this release
- Compatibility matrix
- License requirements
- Scalability and performance
- Power Manager workflow
- Getting started with Power Manager
- Maintaining Power Manager
- Viewing Metrics and Monitoring History in Power Manager
- Manage data center during power reduction
- Policies
- Thresholds
- Alerts
- Widgets for Power Manager
- Adding or removing groups from OpenManage Enterprise dashboard to monitor Power Manager data
- Viewing top five energy consumers
- Viewing power and thermal history of Power Manager groups
- Viewing ratio of devices discovered in OpenManage Enterprise to devices added in Power Manager
- Viewing ratio of devices discovered in OpenManage Enterprise to devices added in Power Manager
- Viewing top ten power offenders
- Viewing top ten temperature offenders
- Reports in Power Manager
- Frequently Asked Questions
- Troubleshooting
- Other information you may need

Power Manager enables you to create and apply multiple policies on a specific device or group. At any instance, if multiple
policies are active on a device, either by policies set on the device or by policies set on the group the device is a part of, the
most restrictive power cap among the policies is applied on the device.
a. For the Time Span option, select Always for the policy to be active from the time of creation. If the policy does not
have to be active always when enabled, click Range and provide a time range during which the policy must be active
when it is enabled.
b. For the Day(s) option, select Always for the policy to be active from the time of creation. If the policy does not have to
be active always when enabled, click Daily, to select specific days on which the policy must be active when it is enabled.
c. For Active Date option, select the date range during which the policy must be active when enabled.
NOTE: A temperature-triggered policy cannot be scheduled.
9. In the Summary section, view the policy details and click Finish.
The policy is created successfully.
The following table provides more information about all the fields in the policy wizard.
Table 12. Policy wizard details
Field Mandatory Value Range
Type Yes
By default, the type is
selected as Static.
● Static policy
● Temperature-triggered
policy
Name Yes Combination of characters,
special characters, and
numbers
Limit: 1 to 255 characters
Description No Combination of characters,
special characters, and
numbers
Limit: 0 to 255 characters
Enable No
By default, the check-box is
selected.
● Select
● Clear
Monitoring time period Yes
By default, the time period is
selected as 1 Day.
● 1 Day
● 7 Days
● 1 Month
● 3 Months
For static policy
Power cap Yes
By default, the power cap
is populated with the Upper
Bound value and hundred
percent.
Recommended limit: Lower
Bound-Upper Bound
Time Span Yes
By default, the option is
selected as Always.
Range Limit: 12 hours format
Day(s) Yes
By default, the option is
selected as Always.
Daily Select at least one day.
Active Date Yes Range
34 Policies