
Install Guide

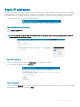
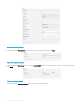


Figure 15. Advanced settings
8 Click Apply.
You have congured the IP address and other settings for the switch module.
Serial connection
To log in to the switch module through the serial connection on the front panel, port-side view, perform the following steps:
1 Connect the console cable with micro-USB connector to the console port on the switch module and to a USB port on the
workstation.
2 Disable any serial communication programs running on the workstation such as synchronization programs.
3 Open a terminal emulator application such as PuTTY, XShell, or SecureCRT on a Windows PC, or TERM, TIP, or C-Kermit in a LINUX
environment. Congure the application as follows:
• In a WIndows environment, use the following values:
– Bits per second—9600
– Databits—8
– Parity—None
– Stop bits—1
– Flow control—None; must be disabled on the host side
NOTE
: Flow control is not supported on the serial connection when attached to a remote terminal. You must disable ow
control on the customer-side remote terminal server in addition to the host-side clients.
• In a UNIX environment using TIP, enter tip /dev/ttyb -9600. at the prompt.
• If you are already using ttyb, use ttya instead and enter tip /dev/ttya -9600 at the prompt.
4 Press enter when the terminal emulator application stops reporting information to display the login prompt.
Switch Console Login:
5 Log in to the switch module as admin, using the default password: password.
You are prompted to change the default admin and user passwords at initial login. Write down the new passwords, and keep this
information in a secure location.
Fabric OS (swDir)
swDir login: admin
Password:
Please change your passwords now.
Use Control-C to exit or press 'Enter' key to proceed.
swDir:admin>
6 (Optional) Modify passwords.
To skip modifying the password, press Ctrl+C.
NOTE
: Passwords are 8 to 40 characters long. They must begin with an alphabetic character. They can include numeric
characters, the period (.), and the underscore (_) only. Passwords are case-sensitive, and do display when you enter them
on the command line.
Initial setup and verication 29