
Install Guide
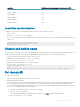


Local time tsTimeZone command parameter—dierence from UTC
Mountain daylight –6,0
Pacic standard –8,0
Pacic daylight –7,0
Alaskan standard –9,0
Alaskan daylight –8,0
Hawaiian standard –10,0
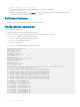
Local time synchronization
To synchronize the local time of the principal or primary FCS device with an external NTP server:
1 Log in as admin.
2 Enter the tsClockServer ipaddr command.
The ipaddr variable represents the IP address of the NTP server that the device accesses. This argument is optional; by default, the
value is LOCL.
switch:admin> tsclockserver xxx.xxx.xxx.xx
Updating Clock Server configuration...done.
Updated with the NTP servers
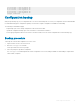
Chassis and switch name
To identify the device uniquely, it is important to change the chassis and switch names. This name change also helps identify the device for
accurate log and error tracking. Specify an easily understandable and meaningful name for the chassis and switch names.
1 Log in to the device through TELNET using the admin account.
2 Change the chassis name using the chassisName command.
device:admin> chassisname Chassis_001
3 Change the switch name using the switchName command.
device:admin> switchname Switch_001
Committing configuration...
Done
Switch name has been changed. Please re-login to the switch for the change to applied
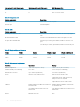
Set domain ID
To set the switch domain ID:
1 Log in to the switch through TELNET using the admin account.
2 Modify the domain ID if required.
The default domain ID is 1. If the switch is not powered on until after it is connected to the fabric and the default domain ID is already
in use, the domain ID for the new switch automatically resets to a unique value. If the switch is connected to the fabric after it is
powered on and the default domain ID is already in use, the fabric segments. To nd the domain IDs that are currently in use, enter the
fabricShow command on another switch in the fabric.
a Disable the switch by entering the switchDisable command.
b Enter the configure command.
The command prompts display sequentially; enter a new value or press enter to accept each default value.
c Enter y after the Fabric param prompt.
Initial setup and
verication 31