
Install Guide

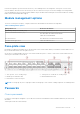
Table Of Contents
- MXG610s Fibre Channel Switch Module Installation Guide May 2021
- Contents
- About this guide
- Switch module overview
- Installation preparation
- Switch module installation overview
- Transceiver and cable installation
- Switch module monitoring
- Initial setup and verification
- Technical specifications
- Regulatory statements
- Caution and danger notices
- Dell EMC support

licenses are assigned to ports 0 and 17 at the factory. The remaining licenses are assigned to active ports on a first-come,
first-served basis. After the licenses are issued, you can move them from one port to another, making port licensing flexible.
You can upgrade the entry-level 8-port and the midlevel 16-port modules with an Enterprise license that includes ISL trunking,
Fabric Vision, and extended fabric support.
Module management options
There are several options to deploy, configure, and monitor the MXG610s as listed in the following table:
Table 3. Management options
Management tool Reference documents
OpenManage Enterprise Modular (GUI) Dell EMC OpenManage Enterprise Modular Edition User Guide
Switch command line interface (CLI)
Brocade Fabric OS Administration Guide
Fabric OS Command Guide
Brocade Web tools Brocade Web Tools Administration Guide
Standard SNMP applications Fabric OS MIB Reference
Face-plate view
Externally accessible ports and LEDs are on the face plate of the switch module. When you install the switch module in the I/O
bay of the MX7000 chassis, the face plate faces out.
Access the I/O module handle at the front of the switch module face plate. To insert or remove the switch module from the
chassis, press the handle’s release latch.
1.
SFP+ ports 0, 17–23—trunk group 1 2. QSFP ports 24–27 and 28–31—trunk group 2
3. Module power and status LED 4. Module identification LED
5. External micro-USB console port
NOTE: You can group any two to eight ports within a trunk group to form a trunk. Trunking requires an ISL trunking license.
Passwords
Chassis passwords
If a chassis-created password applies to your IOMs, the instructions included later in this Installation Guide may not function as
described.
Chassis passwords follow this hierarchy:
Switch module overview
9