
Install Guide

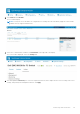
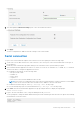
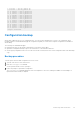
Table Of Contents
- MXG610s Fibre Channel Switch Module Installation Guide May 2021
- Contents
- About this guide
- Switch module overview
- Installation preparation
- Switch module installation overview
- Transceiver and cable installation
- Switch module monitoring
- Initial setup and verification
- Technical specifications
- Regulatory statements
- Caution and danger notices
- Dell EMC support

7. Click and expand the Advanced Settings option. Select the needed check boxes.
8. Click Apply.
You have configured the IP address and other settings for the switch module.
Serial connection
To log in to the switch module through the serial connection on the front panel, perform the following steps:
1. Connect the console cable with the micro-USB connector to the console port on the switch module and to a USB port on
the workstation.
2. Disable any serial communication programs running on the workstation such as synchronization programs.
3. Open a terminal emulator application such as PuTTY, XShell, or SecureCRT on a Windows PC, or TERM, TIP, or C-Kermit in
a LINUX environment. Configure the application as follows:
● In a WIndows environment, use the following values:
○ Bits per second—9600
○ Databits—8
○ Parity—None
○ Stop bits—1
○ Flow control—None; must be disabled on the host side
NOTE:
Flow control is not supported on the serial connection when attached to a remote terminal. You must disable
flow control on the customer-side remote terminal server in addition to the host-side clients.
● In a UNIX environment using TIP, enter tip /dev/ttyb -9600. at the prompt.
● If you are already using ttyb, use ttya instead and enter tip /dev/ttya -9600 at the prompt.
4. Press enter when the terminal emulator application stops reporting information to display the login prompt.
Switch Console Login:
5. Log in to the switch module as admin, using the default password: password.
You are prompted to change the default admin and user passwords at initial login. Write down the new passwords, and keep
this information in a secure location.
Fabric OS (swDir)
swDir login: admin
Password:
Initial setup and verification
25