
Users Guide


98 Configuring the DRAC 5 Using the Web User Interface
Adding and Configuring DRAC 5 Users
To manage your system with the DRAC 5 and maintain system security, create
unique users with specific administrative permissions (or role-based authority).
For additional security, you can also configure alerts that are e-mailed to
specific users when a specific system event occurs.
To add and configure DRAC 5 users, perform the following steps:
NOTE: You must have Configure DRAC 5 permission to perform the following steps.
1
Expand the
System
tree and click
Remote Access
.
2
Click the
Configuration
tab and then click
Users
.
The
Users
page appears, which includes each user’s
State
,
User Name, RAC
Privilege
,
IPMI LAN Privilege
,
IPMI Serial Privilege
and
Serial Over LAN
.
3
In the
User ID
column, click a user ID number.
4
On the
User Main Menu
page, you can configure users, upload a user
certificate, view an existing user certificate, upload a trusted certification
authority (CA) certificate, or view a trusted CA certificate.
If you select
Configure User
and click
Next
, the User Configuration page
is displayed. See step 5 for more information.
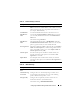
See Table 4-6 if you select the options under the
Smart Card
Configuration
section.
5
In the
User Configuration
page, configure the user’s properties and privileges.
Table 4-7 describes the General
settings for configuring a new or existing
DRAC username and password.
Table 4-8
describes
the
IPMI User Privileges
for configuring the user’s
LAN privileges.
Table 4-9
describes
the
User Group Permissions
for the
IPMI User
Privileges
and the
DRAC User Privileges
settings.
Ta bl e 4 -1 0
describes
the
DRAC Group
permissions. If you add a DRAC
User Privilege to the Administrator, Power User, or Guest User, the
DRAC
Group
will change to the
Custom
group.
6
When completed, click
Apply Changes
.
7
Click the appropriate
User Configuration
page button to continue. See
Ta bl e 4 -1 1.