
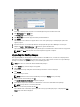
Deployment Guide


NOTE: If you have more than one vdiManager in your grid, you can enter URL for each separated by semi-
colons. For example: http://172.16.0.135/dt/PNAgent/config.xml; http://
172.16.0.136/dt/PNAgent/config.xml
11. Click OK.
Your Windows 2003 DHCP server is now configured with option tag 181.
12. Configure the T10 Thin Client for DHCP and restart the device. For more information, see the
Wyse ThinOS Getting
Started Guide
that shipped with you system.
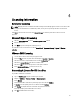
Configuring The Z50D Thin Client
1. Click the Computer icon on the Wyse Zero Toolbar and launch the Connection Manager application.
2. Click Add.
3. Enter the following details in the Option Type window:
– Connection type: Select BROWSER
– Description: Enter a description for the server, such as VIAB.
– URL: Enter the URL which in this case is http://<ip of your VIAB server>. For example: http://172.16.0.135/
– Auto Connect: Check the box for Auto Connect if required.
4. Click OK.
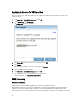
5. Click on the VIAB browser connection in the Connection Manager application.
6. Click Connect to launch the browser.
The URL opens to a login page for Citrix Receiver.
7. Enter your login credentials for the domain so that VDI-in-a-Box can assign you to a desktop.
8. Save this connection to create a shortcut on the desktop that you can launch later.
Configuring The Z90D7 Thin Client
1. Click the Receiver icon on think client desktop to launch the application.
2. Click I Will Enter the URL Now.
3. Enter the URL which in this case is http://<ip of your VIAB server>. For example: http://172.16.0.135/.
4. Enter the domain or username and password as appropriate for your virtual desktop and click Log On.
You are not required to re-enter the URL during login the next time onward, until you logoff or reboot the thin client.
NOTE: For more information on logging in as an administrator, using the File Based Write Filter Utility to enable
changes to the system, and to retrieve your settings after reboot of a thin client, see the Wyse WES7
Administrator’s Guide.
31