
Deployment Guide


• The Windows 2003 or Windows 2008 DHCP server is available.
Configuring The T10 Thin Client Using Windows 2008 DHCP Server
1. Right-click My Computer and select Manage.
2. In the DHCP window, expand your DHCP server option, right-click on IPv4, and click Set Predefined Options.
The Predefined Options and Values window is displayed.
3. Click the Add button.
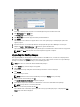
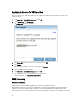
4. Enter the following details in the Option Type window:
– Name: Enter a name for the server. For example, vdiManager.
– Data type: Enter String
– Code: Enter 181
– Description: Enter a description for the server.
5. Click OK.
6. On the Predefined Options and Values window, scroll down to verify that the new option tag 181 has been added
and press Cancel to return to the DHCP window.
7. On the left pane, right-click on Scope Options under your scope and select Configure Options…
8. Scroll down and select Option 181.
9. Enter the URL to access the config.xml file using the IP address of your vdiManager. For example: http://
172.16.0.135/dt/PNAgent/config.xml
NOTE: If you have more than one vdiManager in your grid, you can enter URL for each separated by semi-
colons. For example: http://172.16.0.135/dt/PNAgent/config.xml; http://
172.16.0.136/dt/PNAgent/config.xml
10. Click OK.
Your Windows 2008 DHCP server is now configured with option tag 181.
11. Configure the T10 Thin Client for DHCP and restart the device. For more information, see the
Wyse ThinOS Getting
Started Guide
that shipped with you system.
Configuring The T10 Thin Client Using Windows 2003 DHCP Server
1. Right-click My Computer and select Manage.
2. In the Computer Management console, expand Services and Applications.
3. Highlight DHCP and click Set Predefined Options.
The Predefined Options and Values window is displayed.
4. Click the Add button.
5. Enter the following details in the Option Type window:
– Name: Enter a name for the server. For example, vdiManager.
– Data type: Enter String
– Code: Enter 181
– Description: Enter a description for the server.
6. Click OK.
7. On the Predefined Options and Values window, scroll down to verify that the new option tag 181 has been added
and press Cancel to return to the Computer Management console.
8. On the left pane, right-click on Scope Options under your scope and select Configure Options…
9. Scroll down and select Option 181.
10. Enter the URL to access the config.xml file using the IP address of your vdiManager. For example: http://
172.16.0.135/dt/PNAgent/config.xml
30