
Deployment Guide

NOTE: Ensure you are using the team with HyperV Mode enabled for the Hyper-V virtual network. For
example, if you enabled HyperV Mode on the “BASP Virtual Adapter #2”, set this as the external network
connection for HVSwitch1.
Enabling NIC Bonding Using Microsoft Windows Server 2012
To configure NIC bonding using Microsft Windows Server 2012, see the
Windows Server 2012 NIC Teaming (LBFO)
Deployment and Management
document at microsoft.com/en-us/download/details.aspx?id=30160.
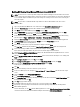
Enabling NIC Bonding Using VMware ESXi
1. Connect to your ESXi hypervisor using vSphere Client or VMware vCenter using the following credentials:
a. IP address: Enter the IP address noted during the procedure Configuring Your Hypervisor.
b. User name: Enter root.
c. Password: Enter your root password. The default is dvssim11.
NOTE: You can install the vSphere client by browsing to http://<ESXi IP ADDRESS>.
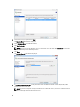
2. To enter your license key, click View on the top menu and select Inventory→ Inventory.
3. Click on the IP address of your ESXi host and select the Configuration tab.
4. Under the Configuration tab, click on the Networking link under the Hardware column to display the virtual switch.
5. Click the Properties... link next to vSwitch0.
6. Click the Network Adapters tab and click Add.
The Add Adapter Wizard window appears.
7. Select vmnic3 under Unclaimed Adapters and click Next.
8. Ensure vmnic2 and vmnic3 appear under Active Adapters, click Next and then Finish.
9. In the Virtual Switch Properties window, navigate to the Ports tab and select Management Network.
10. Click the Edit button.
11. Click the NIC Teaming tab and change the Load Balancing setting to Use explicit failover order.
12. Click to select vmnic3 under Active Adapters and click the Move Down button to place it under Standby Adapters.
13. Click OK and then click Close on the Switch Properties window.
14. To create a team for the VM Network, repeat steps 4 – 10 above using the properties for vSwitch1 (VM Network)
and extra adapter vmnic1.
For more information, please see the VMware KB article 1004088 at kb.vmware.com/kb/1004088.
18