
Deployment Guide

Generating a Base Desktop Image
Your first VIAB image must be imported from an existing Windows VM running on your hypervisor.
See the section Creating A Windows Reference VM for more information.
To successfully generate a base desktop image:
• Ensure that there is only one DHCP server within range.
• Sufficient DHCP addresses must be available.
• Ensure the DHCP lease time is adjusted for short release cycles.
• The Windows Reference VM must be powered on and running on the hypervisor to begin importing the image.
NOTE: To connect to a Windows Active Directory domain, you must have credentials for an existing
domain controller.
For detailed steps on importing and editing the image, see support.citrix.com/proddocs/topic/vdi-53/vdi-first-win-
xen.html.
NIC Bonding
You can enable NIC bonding or teaming to implement redundancy. This involves creating two bonds or teams– one for
the VIAB traffic and one for the hypervisor management. The procedure varies depending on your hypervisor.
NOTE: NIC bonding must be enabled before the VIAB software is configured. If VIAB has already been configured,
ensure the VIAB grid is shut down and the associated VMs have been powered off before enabling NIC bonding.
NOTE: Configuring the bond/team for load balancing has not been tested at this time and is not described in this
document.
Enabling NIC Bonding Using Citrix XenServer
1. Using the IP address set in the topic Configuring Your Hypervisor, connect to your XenServer using the XenCenter
client.
NOTE: You can install the XenCenter client by browsing to http://<XenServer IP ADDRESS> or by downloading
it from the Citrix website.
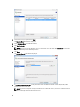
2. Click on your server in the left pane and then select the NICs tab.
3. In the Create Bond window, with the NIC 2 and NIC 3 check boxes selected and the Bond Mode set to Active-
passive, click Create.
4. Click the Create bond anyway button in the Create Bond notification window.
5. Click the Networking tab and verify that Bond 2+3 is configured for the management interface at the bottom of the
window under Management Interfaces.
6. Repeat steps 2 and 3 using NIC 0 and NIC 1 to create the bond.
NOTE: Ensure that you select the Automatically add this network to new virtual machines option for this bond.
7. Click the vdiManager VM in the resource pane and then click the Networking tab. Verify that Bond 0+1 is
configured as the network interface for the VM.
For more information, see the help section within the XenCenter and Citrix article CTX124421 at support.citrix.com/
article/CTX124421 and article CTX129320 at support.citrix.com/article/CTX129320.
16