
Deployment Guide


• Keyboard, mouse, and monitor (not included)
NOTE: You can use the mouse for systems installed with Microsoft Windows Server 2008.
Configuring The Hypervisor
After all the connections are established and the system is powered on, follow the steps for your hypervisor.
Configuring The Hypervisor Using Citrix XenServer
1. Connect to the server console to configure the hypervisor. See the Connecting and Configuring Physical
Connections
section in this document.
After the server boots, the End User License Agreement (EULA) is displayed.
2. Select the checkbox to accept the EULA.
3. Enter the root password for the hypervisor.
NOTE: Save the password to connect to the hypervisor at a later stage.
4. To assign an IP address for the XenServer hypervisor:
a) Select Network and Management Interface.
b) Select the Configure Management interface and enter the required credentials.
c) Select the eth2 Gb3 network connection as the management interface.
d) Select Static.
e) Enter the IP address, netmask, and hostname of the hypervisor.
Configuring The Hypervisor Using Microsoft Hyper-V
1. Connect to the server console to configure the hypervisor. See the Connecting and Configuring Physical
Connections section in this document.
2. When prompted, set the country, time, and keyboard layout and click Next.
3. Accept the license terms and click the Start button.
4. Press <Ctrl><Alt><Delete> to log on.
5. Select Administrator to log on as the administrator.
NOTE: The kaviza account is a service account created by the VIAB software.
6. Change the administrator password when prompted.
7. Click the Server Manager icon on your desktop notification area to start the Server Manager.
8. In the Server Manager console, navigate to Roles and Hyper-V → Hyper-V Manager and select your server.
9. Under the Action tab, select Virtual Network Manager.
10. In the Virtual Network Manager window, click HVSwitch1.
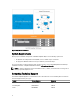
11. Under Connection type in the right panel of the Virtual Network Manager window, note the NIC port assigned to the
external network.
This network connection corresponds to Gb1 in the Physical Network Connections diagram.
NOTE: The virtual switch binds to the first physical port. This may not follow the numerical order of the number
assigned to the port by the operating system. For example, the first physical NIC port (Gb1) may be labeled
Ethernet #2.
12. Open the Initial Configuration Tasks console and click the Configure networking to open the Network Connections
window.
The first physical NIC port assigned to the external network is displayed here along with another network
connection labeled as HVInternalEthernetPort1. Both these connections are applicable for Hyper-V.
10