
Users Guide

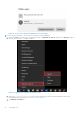


Table Of Contents
- Dell Migrate User's Guide
- Contents
- Introduction
- Data Migration
- Migrate and erase data from old PC
- Check the network settings
- Change the system locale
- Device discovery and prechecks
- Unsupported Windows version
- Applications to close before migrating
- Start Migrate
- Launch Data Assistant on your old PC
- Launch Migrate through SupportAssist on your new Dell PC
- Code verification
- Migrate multiple accounts
- Searching for files and settings
- Troubleshooting network disconnect issues during migration
- Create Data Assistant shortcut
- Select files to migrate
- Migration of file attributes
- Mapping the drives
- Migration progress
- Migration summary
- Migration completion
- Retry or finish the migration process after it was canceled
- Troubleshooting migration failure
- Troubleshooting when migration is completed with warnings
- Issues while launching Data Assistant on old PC
- Data Erase
- Perform erase without migration
- Prechecks for erase
- Disabling BitLocker
- Troubleshooting hard disk failure issues
- Troubleshooting when external storage is found
- Set reminder
- Levels of erase
- Reset SupportAssist OS Recovery
- Windows reset Windows 10
- Prerequisites for resetting Windows 8.1
- Troubleshooting Windows reset
- Manual Reboot
- Running Dell Migrate on desktop PCs
- Tips for faster data migration
- Migration of OneDrive files

Figure 63. User account changed to Administrator on your new PC
2. Perform the following steps to switch user account and proceed with migration:
a. Right-click Start or press Win+X on the keyboard, and go to Shut down or sign out, and then click Sign out. Sign in to
the other user account. For example, Linda M.
Figure 64. Sign out from current user on your new PC
b. Launch Dell Data Assistant.exe from the newly logged in account by searching in Windows search or by
downloading Dell Data Assistant from www.dell.com/DataAssistant.
c. Click Migrate from this PC.
42
Data Migration