Dell Migrate User's Guide August 2021 Rev.
Notes, cautions, and warnings NOTE: A NOTE indicates important information that helps you make better use of your product. CAUTION: A CAUTION indicates either potential damage to hardware or loss of data and tells you how to avoid the problem. WARNING: A WARNING indicates a potential for property damage, personal injury, or death. © 2021 Dell Inc. or its subsidiaries. All rights reserved. Dell, EMC, and other trademarks are trademarks of Dell Inc. or its subsidiaries.
Contents Chapter 1: Introduction................................................................................................................. 5 Supported locales................................................................................................................................................................ 6 Chapter 2: Data Migration............................................................................................................. 7 Migrate and erase data from old PC.............
Unlock the files using an encryption password ...................................................................................................75 Unlock the files using a recovery key..................................................................................................................... 76 Troubleshooting hard disk failure issues......................................................................................................................
1 Introduction Dell Migrate is an on-demand service that enables you to securely migrate your personal files and settings to your Dell PC from any PC running the Windows operating system 8.1 or later. After you migrate your data, you can erase and reset your old PC before you sell, gift, or trade in the PC. To purchase the Migrate service for your PC, go to https://www.dell.com/Migrate.
Supported locales Dell Migrate supports locales across the following languages in multiples regions: Table 2.
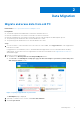
2 Data Migration Migrate and erase data from old PC Related video: How to get started with the Dell Migrate service Prerequisites ● ● ● ● ● You must be signed in as an administrator on both the old and the new PCs. Both the old and the new PCs must be connected to the same local network. Both the old and the new PCs must be connected to a power outlet throughout the data migration process. The operating system installed on old PC must be Windows 8.1 or later.
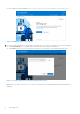
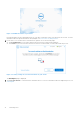
If you are unable to launch Dell Migrate, see Troubleshooting issues with launching Migrate through SupportAssist. Figure 2. Dell Migrate page on your new PC 5. If you are on a network that is not classified as a trusted network on your new PC, perform one of the following steps: ● Click Trust network if you recognize and trust the network to proceed with the migration. ● Click Cancel if you do not trust the network. Reconnect to a network that you trust and restart the process. Figure 3.
Figure 4. Instructions to download and install Dell Data Assistant 6. On your old PC, download and install Dell Data Assistant from www.dell.com/DataAssistant. Figure 5. Download and install Dell Data Assistant on your old PC 7. Run Dell Data Assistant.
Figure 6. Dell Data Assistant on your old PC Dell Data Assistant runs the required prechecks on your old PC and notifies if any of the prechecks are not met. For more information about the prechecks that are run by Migrate, see Device discovery and prechecks. 8. If your old PC is not connected to a trusted network, perform one of the following steps: ● Click Trust Network if you recognize and trust the network to proceed with the migration. ● Click Cancel if you do not trust the network.
Figure 8. Dell Migrate on your old PC Dell Migrate tries to connect your old PC to your new PC. Figure 9. Discovering the new PC on your old PC After Migrate identifies your new PC on the network, a verification code is displayed on your old PC.
Figure 10. Verification code on your old PC 10. Enter the verification code on your new PC. After both the old and the new PCs are paired, a message is displayed on your old PC indicating that the PCs are successfully linked. You must ensure that both the old and the new PCs remain connected to the same network throughout the migration process. Any issue in the connection stops the migration process. For more information about the issues that are related to connecting the PCs, see Code verification.
Figure 12. Different user account on old and new PCs On the old PC, Migrate searches for the files and settings to be migrated from the old PC to the new PC. Figure 13.
Figure 14. Searching for files and settings on your old PC 12. If you want to skip the migration process and only want to erase the old PC, click Erase This PC on the old PC and go to step 18. 13. Perform one of the following steps: ● Click Move everything for me to move all the files and settings from the old PC to the new PC. ● Click Let me choose what to move to select the files and settings that you want to move, instead of moving everything from the old PC to the new PC. Figure 15.
Figure 16. Ready to migrate page on your old PC 14. If you select Let me choose what to move, on the new PC, perform one of the following steps: ● Select the files and settings to be migrated from the old PC to the new PC. ● If you have multiple drives on either your old or new PC, click Change in the Files and settings will be saved to section to map the drives between the old and the new PC, and perform the steps in the Mapping the drives section. Figure 17. select files and settings to migrate 15.
Figure 18. Migration in progress page displayed on your new PC Figure 19. Migration in progress on your old PC After the migration is complete, a summary of files and settings that were migrated from the old PC to the new PC is displayed. 16. Perform one of the following steps: ● Click Finish to complete the migration. ● Click here to view the details of the migration.
Figure 20. Migration summary on your new PC The migration of files and settings from the old PC to the new PC is completed. Figure 21. Migration completed on your new PC For instructions to migrate data from multiple PCs, see the How to migrate data from multiple PCs to your Dell PC video. 17. On the old PC, click Erase This PC to begin erasing the user files and settings the old PC.
Figure 22. Migration completed on your old PC 18. Migrate runs the required prechecks on the old PC for erase. For more information about the prechecks that are performed for erase, see Prechecks for erase. Figure 23. Running prechecks for erase on your old PC 19. If your old PC does not have the latest version of SupportAssist OS Recovery installed, click Windows Reset. Related video: How to erase and reset your old PC using Windows reset 20.
Figure 24. SupportAssist OS Recovery is not present on your old PC For instructions to erase and reset a PC with multiple user accounts, see the How to erase and reset your old PC that has multiple user accounts video. 21. If your old PC has the latest version of SupportAssist OS Recovery installed, click Reboot to begin Dell Reset, and perform the instructions that are displayed on the page. For instructions to reset your PC using Dell reset, see Reset SupportAssist OS Recovery.
There are three kinds of networks: ● Private network—for example, home network. ● Public network—for example, cafe. ● Domain network—for example, school or work. When performing tasks that involve data transfer, it is recommended to use a Private network. Steps 1. On the bottom-right corner of your Desktop, click the Network icon. Figure 26. Network icon on the desktop 2. From the list of the available networks, click Properties for the network to which the PC is connected to.
Figure 27. Network and Internet settings If your network settings are set to Private, migration proceeds automatically. If your settings are set to Public, then migration might not proceed successfully. Ensure that the network you are connected to is one you recognize and trust, for example, your home network. It is not recommended to migrate files and settings on networks that you do not recognize or are not secure.
Figure 28. WiFi Settings 3. If the network is classified as a Public network during your PC set up, and you recognize and trust the network, you can change its classification to a Private network and proceed with the migration. This can also be done from within Migrate. 4. If your network settings are set to Public on either of the PCs, a prompt is displayed to confirm you trust the network that the PCs are connected to before proceeding further with the migration.
Figure 30. Trusting the network on your new PC Change the system locale You can change your system locale if your locale setting is not set correctly for the supported regions. About this task NOTE: You must select the same locale on both the old and new PCs. See Supported locales for the list of supported locales. When Dell Data Assistant is launched on the old PC, it runs a series of prechecks to validate that the PC has the required prerequisites for Migrate. One of the prechecks is the locale settings.
Figure 32. Search for Control Panel using Run 2. In Control Panel, click Time & Language > Region > Administrative > Change system locale. Figure 33. Region 3. Select a new system locale from the supported list of locales, and click OK.
Figure 34. Region Settings 4. Click Restart Now to restart your PC for the changes to take place. Device discovery and prechecks Before the old and the new PCs are linked for migration, a series of checks or validations are done to assess the readiness of the PCs. The checks are known as prechecks or prerequisites.
Locale check This check is done on both the old and new PCs to check if both the PCs are in the same locale. If an unsupported locale is found, you must change to a supported locale and try again. For more information, see Change the system locale. Figure 36. Locale settings in old PC are not supported Logged-in user check This checks the privilege level of the logged in user. To migrate data, you must have administrator privileges.
Figure 38. PCs not connected to same network on your old PC Both the old and the new PCs must be on a trusted network. This allows both the old and the new PCs to be discoverable and communicate. If both the PCs are not on a trusted network, a message is displayed with an option to trust the network. It is recommended to click Trust Network only if you recognize and trust the network. If you do not recognize the network, it is recommended that you switch to a known secure network. Figure 39.
Figure 40. Upgrade Windows Battery check This check confirms that the battery on both the old and the new PCs are more than 20% so that migrating and erasing data process is not interrupted. If the battery is below 20%, and the PC is not connected to a power outlet, Migrate prompts you to connect your PC to a power outlet. You must ensure that your PC is connected to a power outlet irrespective of the battery level when you are erasing the content in the old PC. Figure 41.
Figure 42. Close applications Unsupported Windows version If Migrate is launched on a PC running an unsupported version of the Windows operating system, a warning is displayed that the migration cannot be performed on a noncompatible version of Windows and prompts you to upgrade the operating system on the old PC to a supported version of operating system. The compatible operating system versions are Windows 8.1 and later on the old PC and Windows 10 on the new PC.
Close the following applications after pairing both the old and the new PCs: ● Browser applications: ○ Google Chrome ○ Mozilla Firefox ○ Microsoft Edge ○ Internet Explorer NOTE: These browser applications must be closed if you have opted to migrate browser bookmarks. ● Settings-related applications: ○ System Settings ○ Registry Editor ○ Control Panel Figure 44. Close applications page on your old PC Figure 45.
Start Migrate Related video: How to get started with the Dell Migrate service Prerequisites ● Ensure that both the old and the new PCs are connected to the same network. This is mandatory as the wireless data transfer through the network only works when both the PCs are connected to the same network. The time Migrate takes to complete a migration depends on the network speed and the amount of data to be transferred from the old PC to the new PC. It is recommended to connect to a wired network.
Figure 47. Getting started on Data Assistant ● Click Let's get started to start migration. When the old PC is searching for the new PC, tips to ensure that the PCs find each other are also displayed. Figure 48. Checking for new PC on Data Assistant 3. Based on whether you are migrating to the old or the new PCs, perform one of the following steps: ● Applicable to the new PC only—On your new PC, launch the Dell SupportAssist from Start. At the bottom-left of the page, click Go Now to launch Migrate.
Figure 49. SupportAssist on your new PC On the next page, click Let's get started to start the migration process. The migration process searches for your old PC on the network. The next step takes you through the device pairing for both the old and the new PCs. Figure 50. SupportAssist on your new PC ● Applicable to both the old and the new PCs—after both the old and the new PCs discover each other on the network, a six-digit code is displayed on the old PC. Enter this six-digit code on the new PC.
Figure 51. Successfully paired both the PCs Launch Data Assistant on your old PC Data Assistant helps you transfer files and settings to your new Dell PC and erase personal files and settings from your old PC. Prerequisites ● ● ● ● The operating system that is installed on your old PC must be Windows 8.1 or later. The operating system that is installed on your new PC must be Windows 10 or later. You must be logged in as an administrator on your old and new PCs.
Figure 52. Download and run Dell Data Assistant 2. Data Assistant runs the prechecks on the PC and a message displayed if any of the prerequisites are not met. For more information about the prechecks performed by Data Assistant, see Device discovery and prechecks. Figure 53. Data Assistant on your old PC 3. You must be on a trusted network to securely connect both the old and the new PCs.
Figure 54. Trust network on your old PC The Migrate page is displayed. 4. Click Let's get started to start connecting both the old and the new PCs. For more details about this process, see Start Migrate. Figure 55.
Figure 56. Unable to launch Data Assistant on your old PC The possible reasons for failure in launching Data Assistant on the old PC are: ● Failed to initiate the local database for Data Assistant. This can happen if the local database is created by a Windows user who is not an administrator and is being accessed by using an administrator account on the PC. This may also happen if an outdated version of Data Assistant is installed on your old PC. Perform the following steps to resolve this issue: 1.
NOTE: If SupportAssist is not installed on your PC, download SupportAssist and install it. 2. Perform one of the following steps: ● Click Yes on the Would you like to start using Dell Migrate banner. ● Click Go now in the Dell Migrate can help you copy your files and settings to your new PC, and securely erase data from your old one section. Figure 57. Opening SupportAssist on your new PC The Migrate page is displayed. 3. To read the service contract, click Terms and conditions. 4.
Troubleshooting issues with launching Migrate through SupportAssist If you are unable to see the welcome page for Migrate, or the option to launch Migrate is not displayed on SupportAssist, perform the following steps: 1. Go to Control Panel > Add or Remove programs to uninstall SupportAssist. 2. Restart the new PC and install SupportAssist.
● If the network gets disconnected on either the old or the new PC, reconnect both the PCs to the same network. After both the old and the new PCs are connected, wait for a moment for the verification code to display on your new PC, and enter the same code in your old PC. ● If the PC is connected to a VPN, old PC might display the verification code but would not pair when the code is entered on the new PC. Disconnect VPNs on both the old and the new PCs.
Figure 61. Settings menu on your new PC b. Click Other users, and in the right pane, select the user, and click Change account type. c. In Change account type list, select Administrator, and click OK. NOTE: If the user is already an administrator, select the next user account. Figure 62. Change user account type to Administrator on your new PC The user is assigned administrator rights.
Figure 63. User account changed to Administrator on your new PC 2. Perform the following steps to switch user account and proceed with migration: a. Right-click Start or press Win+X on the keyboard, and go to Shut down or sign out, and then click Sign out. Sign in to the other user account. For example, Linda M. Figure 64. Sign out from current user on your new PC b. Launch Dell Data Assistant.
Figure 65. Dell Data Assistant welcome back page d. Log in or create the corresponding user account on your new PC. For example, if your user account was Linda M on the old PC, you should log in to or create an account that is named Linda M on your new PC. Connect both the old and the new PCs, and migrate the user accounts from the old PC to the new PC using Let me choose and select directory of the current user in C:\Users\, and also selecting the desired settings.
Figure 67. Searching for files and settings Figure 68. Searching for files and settings on your old PC Troubleshooting network disconnect issues during migration When both the old and the new PCs are paired and the network disconnects, you must connect the PCs to the same network that was used during the initial pairing. If you want to use a different network, for example. LAN or a different WiFi network, you must restart the migration on both the old and the new PCs.
● ● ● ● ● ● Turned off PC, laptop, or desktop. Connected to VPN. Turned off modem or router. Removed the LAN connection from PC or laptop or desktop. Weak signal strength. Anti-virus software blocking the connection. Troubleshooting when network is disconnected on old PC Steps 1. Check for the network that got disconnected. Look at the information in the expander on the upper right. Figure 69. PCs not connected to a network is displayed on your old PC 2.
5. If the migration does not proceed after a prolonged period, restart the migration on both the old and new PCs. Troubleshooting when network is disconnected on new PC Steps 1. Check for the network that got disconnected. Look at the information in the expander on the upper right or the message that is displayed in the center of the application to find the network that got disconnected. For example, FancyNancy is the paired network. Figure 71. Your PC has lost connection to the other PC 2.
Troubleshooting when network is disconnected on new PC before pairing About this task If both the old and new PCs are not connected to the same network, the following message is displayed: This PC isn't connected to a network. Figure 73. Your PC is not connected to the network Steps 1. Click the WiFi icon to check if your PC has any network available. Connect your PCs to a network that you recognize and trust. Ensure that you do not use an open or unsecured network such as airports or coffee shops.
● Ensure that the two connected PCs are located close to the router or modem to avoid weak signal strengths. ● If you have a LAN cable, connect the PCs directly using a LAN cable for fastest speeds. Newer versions like Cat 5, Cat 6, and Cat 7, and so on, provides better speeds. ● For WiFi networks, use 5G or 5 GHz bandwidth of networks if available for better speeds.
Figure 76. Create shortcut option If you want to disable the shortcut creation, clear Create a desktop shortcut to make Dell Data Assistant easy to find. Figure 77. Shortcut not present If the Data Assistant shortcut is present on the desktop, and Data Assistant is about to close while some activity is in progress, click Close to cancel the migration.
Figure 78. Shortcut already present Select files to migrate Related video: How to manually select the data you want to migrate Steps Perform one of the following steps: ● Click Move everything for me to move all the user files and settings from old the PC to the new PC. ● Click Let me choose what to move to select the user files and settings you would want to move instead of moving everything from the old PC to the new PC. Figure 79.
all your files from the old PC to the new PC, the file attributes are also migrated along with the files which ensures that the same sort order is maintained for all the files based on criteria such as creation time, modification time, and so on. The file attributes which are migrated along with a file are: ● Timestamp ○ Created time—the time at which the file was created on the old PC is applied to the file after it is copied to the new PC.
Figure 81. Metadata of a file ● Other attributes ○ Read-only—if a file is marked as read-only on the old PC, it means that you can only read the file, but cannot make any changes. ○ Hidden—if a file is marked as hidden, it means that the file is present on the file system, but it is not visible to you. Files that were marked with read-only or hidden attributes on the old PC, are copied along with these attributes on the new PC without you having to set those attributes manually again.
Figure 82. Other attributes of a file Mapping the drives Related video: How to manually map the drives between your old and new PCs before migration About this task When multiple partitions of a local drive are detected on the new PC, Migrate prompts you to choose the drive mapping while selecting the type of migration such as Move everything for me or Let me choose what to move. You can customize the drive mapping between the two PCs.
Figure 83. Mapping drive on your new PC 2. Map the drives between old PC and new PC. For example, the files on the local drive E:/ on the old PC can be mapped to the local drive C:\ or D:\. After selecting the local drive, click Apply. Figure 84. Mapping drivers on your new PC 3. Click Migrate now to begin the data transfer.
Migration progress If you click Migrate now, the migration progress is displayed on the new PC, while on the old PC, the We're migrating your data now message is displayed. The time taken to complete a migration depends on the network speed and the amount of data that are selected for migration. Figure 85. Migration in progress on your new PC Figure 86.
Figure 87. Migration summary on your new PC Figure 88. Migration summary details on your new PC Migration completion The migration from the old PC to the new PC is complete. You can now erase your files and settings from the old PC.
Figure 89. Migration completed on your new PC For instructions to migrate data from multiple PCs, see the How to migrate data from multiple PCs to your Dell PC video. Retry or finish the migration process after it was canceled About this task You can terminate the migration process on the new PC by: ● Click Cancel anytime after both the old and the new PCs have paired—on your new PC, the SupportAssist Home page is displayed.
Steps 1. On the new PC, perform one of the following steps: ● Click OK to complete the migration. Relaunch the migration from the beginning if you want to retry migrating files and settings. For more information, see Migrate and erase data from old PC. ● Click View details to review the files and settings that failed to migrate as the migration process was canceled. Viewing the details provides you an opportunity to retry the failed files or settings without starting from the beginning. Figure 91.
Figure 93. Retry migration on your new PC Troubleshooting migration failure About this task A migration failed message is displayed on Data Assistant if an unexpected error occurs when Data Assistant is running. Figure 94. Migration failed after pairing Steps 1. On the old PC, click Try Again to retry the migration process. On the new PC, click Migrate Again or restart the migration again from the Home page. 2.
Troubleshooting when migration is completed with warnings Related video: How to retry migrating your data About this task If migration is completed with either skipped files or any settings had failed to apply, a message is displayed in Data Assistant on the old PC. You can retry the migration of the skipped files or settings on the new PC. Figure 95. Migration completed with skipped files or settings on your old PC Steps 1.
3. Expand Files not copied to review the skipped files. To view the reason for migration failure of a file, point the mouse cursor on the tooltip icon. Figure 97. Migration summary details on your new PC 4. If you want to retry the migration for the skipped files, review the suggestion on the tooltip icon and take the required action. For example, close the document, browser, control panel, before retrying the migration process. 5.
Figure 99. Migration completed on your new PC The migration process is complete. For instructions to migrate data from multiple PCs, see the How to migrate data from multiple PCs to your Dell PC video. 7. If you want to perform another migration, you must restart the migration process from the beginning on both the old and the new PCs by performing the steps in Migrate and erase data from old PC.
While launching Data Assistant on the old PC, the following error message might be displayed: We weren't able to run Dell Data Assistant - To try again, click Close and wait for five seconds and then restart the application. Figure 101.
2. Restart your old PC, and open Data Assistant with administrator rights or from administrator Windows user account. This creates a database with proper permissions. 3. Open Data Assistant again. ● Failed to obtain read permissions due to encrypted or virtual drive on the old PC. This issue occurs if there is a virtual drive present on the old PC which is created if a Click to Run version of a program such as Microsoft Office applications is installed.
3 Data Erase Perform erase without migration If you perform the erase process on your old PC without migrating your data, your photos, videos, documents, and other important files, these files are permanently lost. On your old PC, a warning is displayed with an option to migrate all your files before beginning the erase process. Perform erase after canceling migration Depending on where you are in your cancellation process, one of the following two prompts is displayed.
Figure 104. Migration canceled ● If you click Erase This PC and migration is not completed, the following page is displayed on the old PC: Figure 105. No migrations performed It is recommended that you click Perform Migration to ensure that all your personal files and settings are safely and securely migrated to your new PC. But you must click Proceed To Erase in case your data was backed up by some other means, and you are ready to reset your old PC to its factory state.
Figure 106. Searching for new PC Perform erase after closing Data Assistant post pairing Figure 107. Relaunching Data Assistant after closing If you click Erase this PC, a message is displayed that migration is not performed. You can either choose to begin migration or go to the erase process. It is recommended that you click Perform Migration to ensure that all your personal files and settings are safely and securely migrated to your new PC.
Figure 108. Ready for migration Figure 109. No migration is performed after pairing is competed If you click Perform Migration, the following message is displayed as Data Assistant has verified and paired with the new PC. Data Assistant continues from where you left: We're ready to start your migration.
Prechecks for erase Figure 110. Running prechecks for erase on your old PC The following prechecks are performed on the old PC when the erase option is initiated with Data Assistant: ● Battery or power source check—Data Assistant checks and prompts you to connect your PC to a power outlet to proceed with the erase process.
Disable device encryption using Device encryption settings Steps 1. In the search box next to the start icon on the taskbar, enter Device encryption. Click Device encryption settings from the list of results. Figure 111. Opening Device encryption settings The Device encryption page is displayed. 2. Click Turn off to disable the device encryption.
Figure 112. Device encryption 3. Click Turn off to confirm. Figure 113. Turning off device encryption It takes a few minutes to finish decrypting the device. Do not perform any other actions on the PC until decryption is complete.
Figure 114. Device encryption decrypting the files Disable BitLocker Steps 1. In the search box next to the start icon on the taskbar, enter BitLocker. Click Manage BitLocker from the list of results. Figure 115. Starting BitLocker 2. Click Turn off BitLocker.
Figure 116. BitLocker Drive Encryption 3. Click Turn off BitLocker. Figure 117.
Figure 118. Decryption in progress 4. Wait for the decryption process to complete. To check the progress of decryption, click the notification. Figure 119. Checking the progress of decryption After the decryption process is complete, the following message is displayed: Decrytion of C: is complete. Figure 120.
Unlock the files using an encryption password Steps 1. Open File Explorer, and right-click the BitLocker encrypted drive, and then click Unlock Drive. Figure 121. Unlocking the drive 2. Enter the BitLocker password, and click Unlock. Figure 122.
Results The drive is unlocked. Unlock the files using a recovery key Steps 1. Open File Explorer, and right-click the BitLocker encrypted drive, and then click Unlock Drive. Figure 123. Unlocking the drive 2. If you do not remember your Windows BitLocker password, click More Options, and then click Enter recovery key.
Figure 124. More options in BitLocker dialog box 3. Enter the BitLocker recovery key to unlock the drive. The recovery key is created when BitLocker is first set up. Use the recovery key that you have saved or printed while setting up BitLocker. Enter BitLocker recovery key, and click Unlock. Figure 125. Recovery key in BitLocker dialog box NOTE: For more information about how to find BitLocker recovery key, see Finding your BitLocker recovery key in Windows 10.
Figure 126. Recovery key in Notepad Troubleshooting hard disk failure issues If a disk failure error message is displayed, your hard drive is experiencing critical errors, and the erase process cannot be completed successfully. It is recommended that you back up all important data, and contact your vendor for possible options to replace the drive as soon as possible. Data Assistant uses a utility that is called Self-Monitoring, Analysis, and Reporting Technology (S.M.A.R.T.
Your system starts checking for any issues with the current drive. It also attempts to repair the issues it finds. Figure 128. Error checking ● Perform the following steps to optimize the drive: 1. Open File Explorer, and on the left pane, click This PC. 2. Right-click any drive. For example, C:. 3. Click Tools, and click Optimize. 4. Repeat step 3 for all drives. Your system should automatically start defragmenting and optimizing the drives.
Figure 129.
Figure 130. Optimizing drives If these steps provided do not help, it is recommended that you back up all the important data, and contact your vendor for possible options to replace the drive as soon as possible. Troubleshooting when external storage is found On the old PC, Data Assistant runs the prechecks for erase to ensure that all the requirements are met before proceeding. When an external storage device is detected on the old PC, Data Assistant prompts you to disconnect the external device.
Set reminder Steps 1. After the migration is completed, a prompt to erase your old PC is displayed. If you want to erase the PC at a future time, you can set a reminder. Select when you want to be reminded, and click Okay. Figure 132. Reminder options 2. Select one of the following options: ● Perform Migration ● Close Figure 133. After choosing to be reminded later Results After the reminder time is lapsed, a Windows notification is displayed on your old PC.
Figure 134. Notification for Windows 10 Figure 135. Notification for Windows 8 and 8.1 NOTE: If your old PC is turned off at the time the notification should have been displayed, the notification is displayed next time you power on your old PC. Levels of erase If you are selling, donating, returning, gifting, or transferring ownership of your Windows PC, you must erase your personal data from the device. No data removal process leaves a hard drive or system as free from residual data as a new product.
Data Assistant provides a level 2 erasure on the drive while retaining the partition used to restore the operating system. For more information about terms and conditions of the Data Assistant service, see www.dell.com/servicecontracts. ● Higher level erase—Some users might need to meet requirements or standards, such as former Department of Defense method 5220.22-M or NIST SP-800-88, Revision 1. Specialized software is available to meet these requirements.
Figure 136. Rebooting PC to start Dell Reset in Data Assistant 2. After the PC is rebooted, the SupportAssist OS Recovery process for PC reset begins. Perform the following steps to continue with the reset process. Based on your PC configuration, the SupportAssist OS Recovery tool suggests the recommended option for PC Reset. ● Select Reset to factory settings to reset your operating system and default applications to the state they were in when your PC was shipped from the Dell factory.
Figure 138. Confirming your reset The progress of the reset process and the estimated time for completion is displayed. Figure 139. Reset and update in progress Your old PC reboots few times to complete the erase and operating system recovery process. Figure 140. PC reset in progress After the PC reset or erase is completed, the PC automatically begins the operating system reinstallation, and the progress is displayed.
Figure 141. Operating system reinstallation in progress After the process for reset and update is completed, reset successful message is displayed. 4. Click SHUTDOWN to finish the reset process. Figure 142. Reset process completed Next steps The following user who must use the fresh operating system can boot the computer, with the Windows setup process guiding them.
Figure 143. Windows reset options Prerequisites for resetting Windows 10 You can reset Windows 10 Home, Pro, Enterprise, and Education editions. NOTE: Data Assistant prompts you to perform Windows reset if you are using a non-Dell PC, or if you do not have SupportAssist OS Recovery 5.3 or later installed on your Dell PC. ● Ensure that you back up all important data, and close all applications before proceeding with Windows reset.
Figure 144. Partition layout for Windows 10 GPT Figure 145. Partition layout for Windows 10 MBR Reset Windows 10 using the Keep my files option Steps 1. Click Keep my files.
Figure 146. Windows reset options 2. Review the list of applications that will be removed from the system after the reset is complete, and click Next. Figure 147. Reset your PC using Keep my files option 3. After confirmation, the PC scans for the applications and a message is displayed stating that it is ready for reset. Click Reset to proceed further. The PC reboots and starts the reset process.
Figure 148. Ready to reset your PC using the Keep my files option Reset Windows 10 using the Remove everything option Steps 1. Click Remove everything.
Figure 149. Windows reset options 2. Perform one of the following steps to perform the PC reset: ● Click Just Remove my files if you want to perform a quick format, such as overwrite files on the drive, on your local drives. It is advisable to use this option if you want to retain the operating system. NOTE: You can recover your data using third-party tools if you choose this method of reset.
Figure 150. Removing everything in your PC The operating system starts configuring the reset process. Figure 151. Resetting in progress This is your last opportunity to cancel the reset. If you want to cancel the reset, click Cancel, or Windows begins to gather information for reset. This can take a few minutes after which the system restarts and uninstalls the applications, removes the settings, user configurations, and clean the drive if a specific option is selected.
NOTE: Depending on the number, type, size of disks, and configuration of the system, the process can take from an hour to a few hours. A progress bar indicating the progress of Windows reset is displayed. Figure 152. Resetting in progress After the reset is completed, the system restarts and reinstalls Windows. Figure 153.
Figure 154. Reinstalling Windows Figure 155. Windows welcome page 4. Select a region. NOTE: You can choose to shut down the system forcefully by holding down the power key if another user continues the setup process. If you plan on keeping the PC, you can setup the system yourself.
Figure 156. Selecting your region Next steps For more information about the rest of the setup process for out-of-box experience, see Windows 10 out of box experience. Prerequisites for resetting Windows 8.1 You can reset for Windows 8.1 Home and Pro. NOTE: If you have upgraded Windows 8 to Windows 8.1, Windows reverts to Windows 8 after reset. You have to manually upgrade from Windows 8 to Windows 8.1.
Figure 157. Checking partition in Disk Management If your OEM has provided you with a recovery media, such as USB drive or DVD, connect the media before proceeding. Perform the following steps to check if your system has recovery media: 1. Press Windows + R key to open Run. 2. Enter diskmgmt.msc, and press Enter. Disk Management is displayed. 3. Verify that the system contains a recovery media. Figure 158.
Reset Windows 8.1 Steps 1. Click Start, and enter reset, and then select Remove everything and reinstall Windows. Figure 159. Searching for Reset settings The Recovery page inside Update and Recovery settings is displayed. 2. Click Remove everything and reinstall Windows, and click Get Started.
Figure 160. Resetting the Settings page Information about what changes are made and what data gets erased is displayed. 3. Click Next. Figure 161.
4. If you have multiple partitions or multiple disk drives in your system, Windows prompts if you want to only clean the Windows installation drive or clean all the drives. Select All drives or skip this step. Figure 162. Resetting the drives 5. Click Clean the drive fully to perform complete reset and remove all personal data. Figure 163.
6. Click Reset to proceed with the system reset. Figure 164. Reset confirmation page NOTE: Depending on the number, type, size of disks, and configuration of the system, the reset can take from an hour to a few hours. The system restarts and resets the system. Figure 165.
Figure 166. Resetting in Progress After reset is complete, Windows restarts to set up the system for a new installation. NOTE: Your system might restart a few times. This is the expected behavior. Figure 167. Setting Windows post reset After the system is rebooted, the out-of-box experience (OOBE) page is displayed.
Figure 168. Out-of-box experience landing page 7. You can either shut down the system forcefully by holding the power button, and let another user set up the system if you intend if you sell, gift, or trade in the system. You can also set the system up yourself. Troubleshooting Windows reset The troubleshooting steps are applicable to both Windows 10 and Windows 8.1. Steps 1. Perform the following steps to disable and reenable reagentc. a. Open Command Prompt as an administrator. b. Enter reagentc.
Figure 169. Reagentc Command 2. Perform the following steps to run a system-wide file scan to check if any files are missing and try to repair them: a. Open Command Prompt as an administrator. b. Enter sfc /scannow. This process takes some time to scan the system and attempt any repairs if possible. Figure 170. System File Checker 3. Restart your PC after the scan is complete, and reset your PC again. 4. Perform the following steps to clean and repair the Windows image.
Figure 171. DISM Advanced Scan 5. If all the methods mentioned above fail to provide a resolution to the issue, create an external recovery media to use Windows reset, or use existing Windows installation media to perform Windows reset. For more information about creating an external recovery media based on your Windows, see Create a recovery drive. For more information about resetting your PC, see Recovery options in Windows 10.
Figure 173. Restarting the system The PC is rebooted and the erase process continues automatically.
4 Running Dell Migrate on desktop PCs This section provides tips and information about migrating data using Dell Migrate when one or both of your PCs are a desktop. Prerequisites 1. Dell SupportAssist for Home PCs must be installed on your new PC. If SupportAssist is not installed on your PC, download and install SupportAssist. For more information about installing SupportAssist, see the latest version of SupportAssist for Home PCs User's Guide on the SupportAssist for Home PCs documentation page. 2.
5 Tips for faster data migration This section provides tips and tricks to speed up data transfer rate while migrating data using a LAN cable or WiFi. ● It is recommended that you use a secured or a private network while migrating data to get the fastest data transfer speed. ● It is recommended that you use a LAN cable for the fastest data migration. The Internet is not used for data migration. PCs are connected only through a local network.
Types of LAN cables Local area network cables are typically referred to as LAN cables or Ethernet cables. You can connect these to your router and network port of your computer. LAN cables come in various standards, including Cat5, Cat5e, Cat6, Cat6a, Cat7, Cat7a, and Cat8. Regardless of type, they have the same RJ45 connector on each end. In general, performance improves with each standard. Cat5e cables are faster than Cat5. Most LAN cables have the standard name printed on the cable body.
3. Align the router antennas—if the antennas are external and adjustable, adjust router antennas to get the best WiFi signal strength. Point your router antennas vertically to emit the WiFi signal to be sent horizontally, and conversely. Router antennas are omnidirectional that spread the signal equally in all directions. 4. Choose the right WiFi frequency band—to achieve maximum speed, switch to the 5 GHz band on each device as routers usually support two frequency bands, 2.4 GHz and 5 GHz. 5.
6 Migration of OneDrive files Dell Technologies recommends that you sign in to the same OneDrive account on both the old and the new PCs before starting migration.
2. Click Settings. 3. In the Accounts section, click Email & accounts. Your email address is displayed in the Email & accounts section. Figure 175. Microsoft email address in Settings How do I retrieve or reset my OneDrive password? Your OneDrive email address is the same as your Microsoft or Office365 email address. You can use the same password that is used in your Microsoft or Office365 account to sign in to OneDrive.
What if I do not sign in to OneDrive on my old PC when prompted? If you had previously signed in to OneDrive on your old PC, but were logged out for some reason, for example, the password for your Microsoft account password was updated, then OneDrive does not sync your files to the cloud unless you sign in to OneDrive. Dell Data Assistant detects that you are not signed in to OneDrive and prompts you to sign in.
Why is the sign-in prompt for OneDrive not displayed on Windows 8.1 operating system when Dell Data Assistant starts? SkyDrive, an older version of OneDrive, is installed on Windows 8.1 operating system which is not supported by Dell Data Assistant. In this case, your SkyDrive files are migrated along with the rest of the non-OneDrive files. If you do not want to migrate the SkyDrive folder, clear the option to migrate SkyDrive files on the Let me choose what to move page.
Figure 179. Multiple OneDrive accounts For each OneDrive account, you have a separate system tray icon. You can find the account emails by right-clicking each of the system tray icons and selecting settings as described in the How do I find my OneDrive email address? section. NOTE: If you need the data from all your OneDrive accounts that are used on your old PC, sign in to all the same OneDrive accounts on your new PC as well before starting the migration.
Figure 180. Option to select Desktop, Documents, and Pictures folders for backup Select the folders to backup and click Start backup. Before you click Start Backup, the default location of Desktop, Documents, and Pictures folders is C: \Users\\. Figure 181. Desktop Properties window before clicking Start Backup After you click Start Backup, the default location of Desktop, Documents, and Pictures folders changes to C: \Users\\OneDrive\.
Figure 182. Desktop Properties window after clicking Start Backup Customization of default location of Desktop, Documents, and Pictures folders If you want to customize the default location of Desktop folder, perform the following steps: 1. Navigate to the location where the Desktop folder is present and right-click on the folder. 2. Select Properties, and then select Location. 3. Click Move, and then select the new path of the location where you want to save the desktop files. Figure 183.
How do I stop backing up Desktop, Pictures, and Documents folders in OneDrive? If you want to stop backup of your folders to OneDrive, update your folder selections in OneDrive settings. If you are already using OneDrive, Dell Technologies recommends signing in to your same OneDrive account on your new PC rather than disabling your backups. Perform the following steps: 1. Click the white or blue cloud icon in your notification area, click Help & Settings, and then click Settings. Figure 184.
Figure 186. OneDrive — Stop backup This restores the Desktop, Documents, and Pictures folder locations to their original location on the hard drive. After you stop backing up a folder, the files that were already backed up by OneDrive stays in the OneDrive folder and is not displayed on your local device folder. For more information, see Back up your Documents, Pictures, and Desktop folders with OneDrive.
Since the old PC has Desktop, Documents, and Pictures folders in the OneDrive folder, clearing the OneDrive folder automatically stops the migration of all the files and folders in it including the Desktop, Documents, and Pictures folders. Logged in to OneDrive on the old PC and selected Desktop, Documents, and Pictures for backup The files are migrated from the OneDrive folder on the old PC to the default location of the Desktop, Documents, and Pictures folder on the new PC.