
Users Guide


To configure the boot order:
1. Click the required option:
• Create Multiplatform Package
• Create Local System Package
• Open a Saved Package
NOTE: To open a saved package, click Open a Saved Package, browse to the file location, and
then click Open.
2. Click Edit , or double-click the option.
3. In the bootorder option row, click View/Change in the Value to set column.
The boot order screen is displayed with the current boot order type and boot order options. For
more information, see Configure boot order.
• To create a multiplatform package, you can add devices.
NOTE: The multiplatform package supports only the legacy boot order.
• To create a local system package and to open a saved package, you can add devices and edit the
existing boot order, if present.
NOTE: Use the arrow buttons at the bottom of the Boot Order screen to change the boot
order of the devices.
4. Click OK to save the configuration, or click CLOSE to discard the changes and close the Boot Order
screen.
5. To apply the modifications, export the configuration in ,ini or .exe format. See, Exporting the BIOS
configuration.
Related Links:
• Adding a new device to the boot order
• Boot order type
Boot order screen
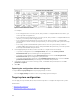
The following table displays the available options on the Dell Command | Configure - Boot Order screen.
Table 3. Options on the boot order screen
Options Description
Device Type Displays the type of device.
Device Instance Displays a unique number to identify the device on the system.
Shortform Displays the short form of the device name. If the system has many devices of the
same device type, then the short form of the device is displayed with a .<number>
notation. For example, if the system has an internal HDD, eSATA HDD, and eSATA
Dock HDD, then the short forms are displayed as hdd.1, hdd.2, and hdd.3 respectively.
Description Displays a short description for the device.
Status Displays if the device is turned on or off.
Delete
Removes the device from the boot order. Click X to remove a device.
13