
Setup Guide


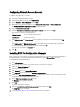

Configuring Network Access Account
To configure the network access account:
1. Launch the Configuration Manager console.
2. In Configuration Manager console, click Administration.
3. Expand Overview → Site Configuration and click Sites.
4. Right-click the site you want to configure, select Configure Site Components → Software Distribution.
The Software Distribution Component Properties screen is displayed.
5. Click the Network Access Account tab.
6. Select the Specify the account that accesses network locations option and then click Set.
These options are listed in the drop-down menu:
Existing Account To use an already existing account.
New Account To add a new account.
7. Click Existing Account. The Select Account screen is displayed, select your user account and then click OK.
Or
Click New Account. The Windows User Account screen is displayed. Enter the administrator credentials for
accessing Configuration Manager from client systems, and then click OK.
The user name is displayed in the Account field.
8. Click OK.
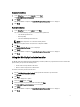
Installing DCIP For Configuration Manager
Before you proceed, ensure that you are logged in as administrator on the system where you want to install DCIP for
Configuration Manager. On systems without Configuration Manager only the Warranty Utility is installed.
To install DCIP for Configuration Manager:
1. Go to dell.com/support.
2. Enter the Service Tag or browse and select the the client system you are targeting.
3. Click on the Drivers & Downloads tab.
4. Select the operating system.
5. In the Category field, select Systems Management.
6. Click Download adjacent to version 3.1 of Dell Client Integration Pack .
7. Download the DCIP_3.1.xx_H82KH_A00_ZPE.exe file and extract the contents to a folder on the local drive of the
system that runs the Configuration Manager Site Server.
8. Run the Dell_Client_Integration_Pack.msi package.
The Welcome screen for DCIP is displayed.
9. Click Next.
The license agreement is displayed.
10. Select the I accept the terms in the license agreement option and then click Next.
The Setup Type screen is displayed.
11. Select Complete Installation or Custom Installation based on your requirement.
6