
Users Guide

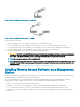


If you have one chassis, connect CMC and the standby CMC to the management network. If you have a redundant CMC, use another
network cable and connect the GB CMC port to a second port of the management network.
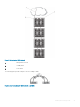
If you have more than one chassis you can choose between the basic connection, where each CMC is connected to the management
network, or a daisy-chained chassis connection, where the chassis are connected in series and only one CMC is connected to the
management network. The basic connection type uses more ports on the management network and provides greater redundancy. The
daisy-chain connection type uses fewer ports on the management network but introduces dependencies between CMCs, reducing the
redundancy of the system.
NOTE: Failure to cable CMC properly in a redundant conguration can cause loss of management and create broadcast storms.
Related links
Basic CMC Network Connection
Daisy chain CMC Network Connection
Conguring Initial CMC Network
Conguring Initial CMC Network
NOTE: Changing the CMC network settings may disconnect the current network connection.
You can perform the initial network conguration of CMC before or after CMC has an IP address. To congure CMC’s initial network
settings before you have an IP address, you can use either of the following interfaces:
• The LCD panel on the front of the chassis
• Dell CMC serial console
To congure initial network settings after CMC has an IP address, you can use any of the following interfaces:
• Command line interfaces (CLIs) such as a serial console, Telnet, SSH, or the Dell CMC console through iKVM
• Remote RACADM
• CMC Web interface
CMC supports both IPv4 and IPv6 addressing modes. The conguration settings for IPv4 and IPv6 are independent of one another.
Conguring CMC Network Using LCD Panel Interface
NOTE
: The option to congure CMC using the LCD panel is available only until CMC is deployed or the default password is
changed. If the password is not changed, you can continue to use the LCD to reset the congurations of the CMC causing a
possible security risk.
The LCD panel is on the bottom-left corner on the front of the chassis.
To set up a network using the LCD panel interface:
1 Press the chassis power button to turn it on.
The LCD screen displays a series of initialization screens as it powers up. When it is ready, the Language Setup screen is displayed.
2 Select the language using the arrow buttons, press the center button to select the Accept/Yes, and press the center button again.
The Enclosure screen displays the following question: Congure Enclosure?
• Press the center button to continue to CMC Network Settings screen. See step 4.
• To exit the Congure Enclosure menu, select the NO icon and press the center button. See step 9.
3 Press the center button to continue to CMC Network Settings screen.
4 Select the network speed (10Mbps, 100Mbps, Auto (1 Gbps)) using the down arrow button.
The Network Speed setting must match your network conguration for eective network throughput. Setting the Network Speed
lower than the speed of your network conguration increases bandwidth consumption and slows network communication. Determine
30
Installing and Setting Up CMC