
Users Guide


cfgSerialConsoleCommand=""
cfgSerialConsoleColumns=0
1. Press the CMC release latch on the handle and move the handle away from the module front panel.
Slide the CMC module out of the enclosure.
NOTE: Electrostatic discharge (ESD) events can damage CMC. Under certain conditions, ESD
may build up on your body or an object, and then discharge into your CMC. To prevent ESD
damage, you must take precautions to discharge static electricity from your body while
handling and accessing CMC outside the Chassis.
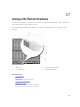
2. Remove the jumper plug from the password reset connector, and insert a 2-pin jumper to enable the
default administrator account. To locate the password jumper on the CMC board, see the following
figure.
Figure 9. Password Reset Jumper Location
Table 43. CMC Password Jumper Settings
PASSWORD_R
SET
(default) The password reset feature is disabled.
The password reset feature is enabled.
3. Slide the CMC module into the enclosure. Reattach any cables that were disconnected.
NOTE: Make sure that the CMC module becomes the active CMC, and remains the active CMC
until the remaining steps are completed.
4. If the jumpered CMC module is the only CMC, then wait for it to finish rebooting. If there is a
redundant CMCs in the chassis, then initiate a changeover to make the jumpered CMC module
active. In the Web interface, in the system tree, go to Chassis Overview and click Power → Control,
select the Reset CMC (warm boot), and click Apply.
CMC automatically fails over to the redundant module, and that module now becomes active.
267