
Users Guide


NOTE: To reset components, you must have Debug Command Administrator privilege.
To reset the components using the CMC Web interface,
1. In the left pane, click Chassis Overview > Troubleshooting > Reset Components.
The Reset Components page is displayed.
2. To reset the active CMC, in the CMC Status section, click Reset/Failover CMC. If a standby CMC is present and a chassis is fully
redundant, a failover occurs causing the standby CMC to become active. However, if a standby CMC is not present, the CMC that is
available is rebooted.
3. To virtually reseat the server, in the Virtual Reseat Server section, select servers to reseat, and then click Apply Selections.
For more information, see the Online Help.
This operation causes the servers to behave as if they were removed and reinserted.
Saving or Restoring Chassis Configuration
This is a licensed feature. To save or restore a backup of the Chassis configuration using the CMC Web interface:
1. In the left pane, click Chassis Overview > Setup > Chassis Backup. The Chassis Backup page is displayed. To save the chassis
configuration, click Save. Override the default file path (optional) and click OK to save the file. The default backup file name contains
the service tag of the chassis. This backup file can be used later to restore the settings and certificates for this chassis only.
2. To restore the chassis configuration, in the ”Restore" section, click Browse, specify the backup file, and then click Restore.
NOTE:
• CMC does not reset upon restoring configuration, however CMC services may take some time to effectively
impose any changed or new configuration. After successful completion, all current sessions are closed.
• Flexaddress information, server profiles, and extended storage are not saved or restored with the Chassis
Configuration.
Troubleshooting Network Time Protocol (NTP)
Errors
After configuring CMC to synchronize the clock with a remote time server over the network, it may take 2-3 minutes before a change in
the date and time occurs. If after this time there is still no change, it may be necessary to troubleshoot a problem. CMC may not be able to
synchronize the clock for the following reasons:
• Problem with the NTP Server 1, NTP Server 2, and NTP Server 3 settings.
• Invalid host name or IP address may have been accidentally entered.
• Network connectivity problem that prevents CMC from communicating with any of the configured NTP servers.
• DNS problem, preventing any of the NTP server host names from being resolved.
To troubleshoot the NTP–related problems, check the information in the CMC trace log. This log contains an error message for NTP
related failures. If CMC is not able to synchronize with any of the configured remote NTP servers, then CMC time is synchronized to the
local system clock and the trace log contains an entry similar to the following:
Jan 8 20:02:40 cmc ntpd[1423]: synchronized to LOCAL(0), stratum 10
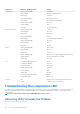
You can also check the ntpd status by typing the following racadm command:
racadm getractime –n
The output of this command contains detailed NTP statistics that may be useful in debugging the problem.
If you attempt to configure a Windows-based NTP server, it may help to increase the MaxDist parameter for ntpd. Before changing
this parameter, understand all the implications, since the default setting must be large enough to work with most NTP servers.
To modify the parameter, type the following command:
racadm config –g cfgRemoteHosts –o cfgRhostsNtpMaxDist 32
After making the change, disable NTP, wait for 5-10 seconds, then enable NTP again:
186
Troubleshooting and Recovery