
Users Guide


out-of-date devices, or a baseline repository that contains updates for all the devices. You can also create update bundles for Linux or
Windows based on the update mode required. DRM enables you to save the repository to a CIFS or NFS share. The CMC Web interface
enables you to congure the credentials and location details for the share. Using the CMC Web interface, you can then perform the server
components update for a single server or multiple servers.
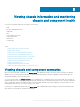
Pre-requisites for using network share update mode
The following pre-requisites are required to update server component rmware using Network Share mode:
• The servers must have iDRAC Enterprise license
• Lifecycle controller must be enabled on servers..
• Dell Repository Manager 1.8 or later must be installed on the system.
• You must have CMC Administrator privileges.
Upgrading server component rmware from network share using CMC
web interface
To upgrade the server components rmware version to the next version using the Update from Network Share mode:
1 In the CMC Web interface, in the system tree, go to Server Overview and then click Update > Server Component Update.
The Server Component Update page is displayed.
2 In the Choose Update Type section, select Update from Network Share. For more information, see Choosing Server Component
Firmware Update Type.
3 If the Network Share is not connected, congure the Network Share for the chassis. To congure or edit the network share details, in
the Network Share Properties table click
Edit. For more information see Conguring Network Share Using CMC Web Interface.
4 Click Save Inventory Report to export the chassis inventory le that contains the components and rmware details.
The Inventory.xml le is saved on an external system. The Dell Repository Manager uses the inventory.xml le to create customized
bundles of updates. This Repositry is stored in the CIFS or NFS Share congured by CMC. For information on creating a repository
using the Dell Repository Manger see the Dell Repository Manager Data Center Version 1.8 User’s Guide and the Dell Repository
Manager Business Client Version 1.8 User’s Guide available at dell.com/support/manuals.
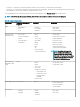
5 Click Check for Updates to view the rmware updates available in the network share.
The Component/Device Firmware Inventory section displays the current rmware versions of the components and devices across all
the servers present in the chassis and rmware versions of the DUPs available in the Network Share.
NOTE
: Click Collapse against a slot to collapse the component and device rmware details for the specic slot.
Alternatively, to view all the details again, click Expand.
6 In the Component/Device Firmware Inventory section, select the check box against Select/Deselect All to select all the supported
servers. Alternatively, select the check box against the server for which you want to update the server component rmware. You
cannot select individual components for the server.
7 Select one of the following options to specify if a system reboot is required after the updates are scheduled:
• Reboot Now — Updates are scheduled and the server is rebooted, immediately applying the updates to the server components.
• On Next Reboot — Updates are scheduled but are applied only after the next server reboot.
8 Click Update to schedule rmware updates for the available components of the selected servers.
A message is displayed based on the type of updates contained and asking you to conrm if you want to continue.
9 Click OK to continue and complete scheduling the rmware update for the selected servers.
NOTE
: The Job Status column displays the job status of the operations scheduled on the server. The job status is
dynamically updated.
Updating rmware 55