
Users Guide

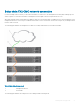
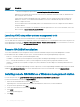

Following are the steps to daisy-chain four FX2 CMC modules:
1 Connect the GB port of the FX2 CMC in the rst chassis to the management network.
2 Connect the GB port of the FX2 CMC in the second chassis to the STK port of the FX2 CMC in the rst chassis.
3 If you have a third chassis, connect the GB port of its FX2 CMC to the STK port of the FX2 CMC in the second chassis.
4 If you have a fourth chassis, connect the GB port of its FX2 CMC to the STK port of the FX2 CMC in the third chassis.
CAUTION
: The STK port on any CMC must never be connected to the management network. It can only be connected to the GB
port on another chassis. Connecting a STK port to the management network can disrupt the network and cause loss of data.
Cabling GB and STK to the same network (broadcast domain) can cause a broadcast storm.
NOTE: Resetting a CMC whose STK port is chained to another CMC can disrupt the network for CMCs that appear later in the
chain. The child CMCs may log messages indicating that the network link is lost.
Using remote access software from a management station
You can access CMC from a management station using various remote access software. Here is a list of remote access softwares by Dell
which is available from your Operating System.
Table 10. CMC Interfaces
Interface/
Protocol
Description
Serial CMC supports a serial text console that can be launched using any terminal emulation software. Following are couple
of examples of terminal emulation software that can be used to connect to CMC.
• Linux Minicom
• Hilgraeve’s HyperTerminal for Windows
Connect one end of the serial null modem cable (present at both ends) to the serial connector on the back of the
chassis. Connect the other end of the cable to management station serial port. For more information on connecting
cables, refer to the back panel of the chassis in Chassis Overview section.
Congure your terminal emulation software with the following parameters:
• Baud rate: 115200
• Port: COM1
• Data: 8 bit
28 Installing and setting up CMC