
Users Guide


Observing LEDs to Isolate the Problem
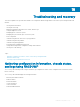
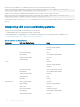
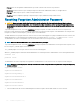
The CMC has an LED which changes color to indicate:
Table 34. LED color indicators
Color Description
Blue Normal operation
Blue, blinking ID (0.5 second on, 0.5 second o)
Amber Chassis fault summary
Amber, blinking Chassis fault with concurrent ID
Obtain Recovery Information from DB-9 Serial Port
If the CMC LED is amber, recovery information is available from the DB-9 serial port located on the front of CMC.
To obtain recovery information:
1 Install a NULL modem cable between a CMC system and a client system.
2 Open a terminal emulator of your choice (such as HyperTerminal or Minicom). Enter the following specication when prompted: 8 bits,
no parity, no ow control, baud rate 115200.
A core memory failure displays an error message every 5 seconds.
3 Press the <Enter> key.
If a recovery prompt appears, additional information is available. The prompt indicates the CMC slot number and failure type.
To display failure reason and syntax for a few commands, type recover, and then press <Enter>.
Sample prompts:
recover1[self test] CMC self test failure
recover1[Bad FW images] CMC has corrupted images
• If the prompt indicates a self test failure, there are no serviceable components on CMC. CMC is bad and must be returned to Dell.
• If the prompt indicates Bad FW Images, complete tasks in Recovering Firmware Image1.
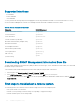
Recovering Firmware Image
CMC enters recover mode when a normal CMC operating boot is not possible. In recover mode, a small subset of commands are available
that allow you to reprogram the ash devices by uploading the rmware update le, fx2_cmc.bin. This is the same rmware image le used
for normal rmware updates. The recovery process displays its current activity and boots to the CMC OS upon completion.
When you type recover and then press <Enter> at the recovery prompt, the recover reason and available sub-commands display. An
example recover sequence may be:
recover getniccfg
recover setniccfg 192.168.0.120 255.255.255.0
192.168.0.1
recover ping 192.168.0.100
recover fwupdate -g -a 192.168.0.100
NOTE
: Connect the network cable to the left most RJ45.
168 Troubleshooting and recovery