
User guide


NetXtreme II User Guide
September 2013
Broadcom Corporation
Page 130 Detailed Procedures Document INGSRVT78-CDUM100-R
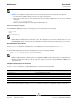
3. The Component Services dialogue box displays.
4. Open Component Services and then open Computers.
5. Right-click My Computer and click Properties.
6. In My Computer Properties, click the COM Security tab.
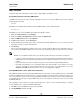
7. Under Launch and Activation Permissions, click Edit Limits.
8. Follow these steps if your name or your group does not appear in the Groups or user names list.
a. In the Launch Permission dialog box, click Add.
b. In the Select Users, Computers, or Groups dialog box, add your name and the group in the Enter the object names
to select box, and then click OK.
c. In the Launch Permission dialog box, select your user and group in the Group or user names list.
d. In the Permissions for User area, select Allow for Remote Launch and Remote Activation, and then click OK.
Figure 1: Launch and Activation Permission
For more information, see Securing a Remote WMI Connection on the Microsoft Developer Network site.
Special Configuration for WMI on Different Systems
• On a Windows XP Pro or Windows 2003 Server computer, ensure that remote logons are not being coerced to the
GUEST account (referred to as “ForceGuest”, which is enabled by default on computers that are not attached to a
domain). Open the Local Security Policy editor by clicking Start > Run and entering secpol.msc. Open the Local
Policies node and select Security Options. Then, scroll down to the setting titled Network access: Sharing and
security model for local accounts. If this is set to Guest only, change it to Classic and restart the computer.
• In Windows Vista and Windows 7, in order to let all users in the administrator group connect using the WMI namespace,
the user might need to change the LocalAccountTokenFilterPolicy as needed.