
Users Guide


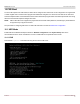
Table Of Contents
- Table of Contents
- 1 Regulatory and Safety Approvals
- 2 Functional Description
- 3 Network Link and Activity Indication
- 4 Features
- 4.1 Software and Hardware Features
- 4.2 Virtualization Features
- 4.3 VXLAN
- 4.4 NVGRE/GRE/IP-in-IP/Geneve
- 4.5 Stateless Offloads
- 4.6 Priority Flow Control
- 4.7 Virtualization Offload
- 4.8 SR-IOV
- 4.9 Network Partitioning (NPAR)
- 4.10 Security
- 4.11 RDMA over Converged Ethernet – RoCE
- 4.12 VMWare Enhanced Networking Stack (ENS)
- 4.13 Supported Combinations
- 4.14 Unsupported Combinations
- 5 Installing the Hardware
- 6 Software Packages and Installation
- 7 Updating the Firmware
- 8 Link Aggregation
- 9 System-Level Configuration
- 10 PXE Boot
- 11 SR-IOV – Configuration and Use Case Examples
- 12 NPAR – Configuration and Use Case Example
- 13 Tunneling Configuration Examples
- 14 RoCE – Configuration and Use Case Examples
- 15 DCBX – Data Center Bridging
- 16 DPDK – Configuration and Use Case Examples
- Revision History

Broadcom NetXtreme-E-UG304-2CS
75
NetXtreme-E User Guide User Guide for Dell Platforms
9.3.6 ESXi Driver Settings
NOTE: For 10GBASE-T NetXtreme-E network adapters, auto-negotiation must be enabled. Using forced speed on a
10GBASE-T adapter results in ESXCLI command failure.
$ esxcli network nic get -n <iface> – This command shows the current speed, duplex, driver version,
firmware version and link status.
$ esxcli network nic set -S 10000 -D full -n <iface> – This command sets the forced speed to
10 Gb/s.
$ esxcli network nic set -a -n <iface> – This enables linkspeed auto-negotiation on interface <iface>.
$ esxcli network nic pauseParams list – Use this command to get pause Parameters list.
$ esxcli network nic pauseParams set --auto <1/0> --rx <1/0> --tx <1/0> -n <iface> – Use
this command to set pause parameters.
NOTE: Flow control/pause auto-negotiation can be set only when the interface is configured in link speed auto-negotiation
mode.