
User's Manual


Dell™ Backup and Recovery Manager V1.3 Page 13
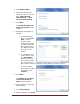
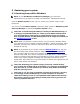
NOTE: For external storage devices, clicking Refresh will de-select a device
from the drop-down menu and refresh the list of available devices. If the
Next button was enabled, it will be disabled until you select a new device.
If you select an optical device from the drop-down menu and a blank disk was
found in the device, the Next button will be enabled. Otherwise you will be
asked to insert blank media in the drive. Click Refresh after the drive spins
up to enable the Next button.
Click Next.
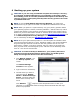
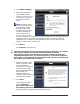
If you select optical media or insert a small USB flash drive, the backup will
automatically be bootable and you will go straight to the Summary screen
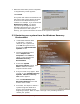
shown in step 4. If you select a large external storage device and it is not
already bootable, a screen with a check box labeled Make Backup
Bootable? will appear.
CAUTION: The process of making a bootable backup will erase all
content on the external storage device.
The default state of this check
box is checked. This is
strongly recommended. A
bootable backup is necessary
to restore to a new or
replacement hard drive in the
event of a primary hard drive
failure.
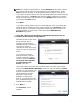
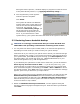
If you want to make the
backup bootable, read the
caution statement carefully
and then check the Remove
all my data and reformat
my External Storage
Device check box.
If the large external storage device contains data you do not want erased,
uncheck the Make Backup Bootable? check box. This will enable the Next
> button. If you proceed, your
backup will be stored on the
selected external storage
device but it will not be
bootable. To restore the
backup, you will need to boot
from a bootable disk such as a
bootable Recovery disk.
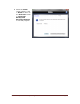
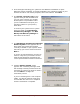
4. Click Next >
The Summary screen
appears.