
User's Manual
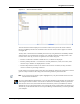


Table Of Contents
- Contents
- About This Guide
- Chapter 1
- Active System Manager Overview
- Chapter 2
- Getting Started
- Chapter 3
- Account Management
- Chapter 4
- User Profile Management
- Managing Security Functions
- Managing Groups
- Defining Permissions
- Modifying Permissions
- Managing Authentication Repositories
- Chapter 5
- Inventory Management
- Understanding Resource Modeling
- Building a Standard Active System Manager Inventory
- Configuring Discovery Setup
- Running Discovery
- Using Resource Types
- Using Resource Instances
- Building Resource Instances
- Modifying Core Properties for Resource Instances
- Modifying Resource Instance Resource Availability Dates
- Modifying Resource Instance Interfaces
- Displaying the Resource Availability Calendar View
- Deleting Resource Instances
- Setting Inventory Parameter Values
- Resolving Resource Dependencies
- Using Resource Interface Types
- Linking Resources
- Importing Inventory
- Importing Connectivity
- Exporting Connectivity
- Managing Resource Pools
- Managing Maintenance Windows
- Managing Virtual Resources
- Chapter 6
- Firmware Management
- Creating Active System Manager Software Repositories
- Updating Dell Chassis Firmware from the Operations Center
- Updating Dell Server Firmware
- Updating Dell Blade/Rack Servers Firmware from the Operation Center
- Updating Dell Blade/Rack Servers Firmware from an Active Session
- Updating Dell Blade/Rack Servers Firmware Using the Attach Server Profile Virtual Operation
- Updating Dell Blade/Rack Servers Firmware through an Orchestration
- Updating Dell Blade/Rack Servers Firmware Using the Attach Server Profile Custom Operation
- Minimum Firmware Versions for Active System Manager Components
- Chapter 7
- Server Template and Profiles
- Creating a Server Template
- Editing a Server Template
- Adding or Editing BIOS Information on a Server Template
- Adding or Editing RAID Information on a Server Template
- Adding or Editing Firmware Settings on a Server Template
- Adding or Editing Networks Settings on a Server Template
- Naming Conventions when using Orchestrations
- Server Profiles
- Chapter 8
- Using Inventory
- Chapter 9
- Repository Management
- Chapter 10
- Network Management
- Chapter 11
- Template Management
- Template Types
- Working with Templates
- Creating New Templates
- Saving Templates
- Changing Template Ownership and Permissions
- Opening Templates
- Closing Templates
- Deleting Templates
- Managing Template History Details
- Filtering Templates
- Validating Templates
- Importing Templates
- Exporting Templates
- Attaching a Template Image
- Scheduling Templates
- Archiving Templates using the Templates View
- Restoring Archived Templates
- Updating Templates using the Template Editor
- Viewing and Modifying Template Properties
- Adding Resource Types
- Setting Resource Type Properties for Scheduling
- Deleting Resource Types
- Adding Resource Types Based on Manufacturer Only
- Adding Resource Instances
- Modifying Resource Properties
- Deleting Resource Instances
- Defining Provisioning Policies
- Supporting Layer 2 Switching
- Using Annotations
- Updating Templates using the Link Editor
- Associating an Orchestration Workflow with Templates
- Chapter 12
- Session Management
- Introducing the Sessions Perspective
- Working with Running Sessions
- Scheduling a Session Using Templates
- Creating an Instant Session
- Opening Sessions
- Opening the Session Editor
- Using the Sessions Calendar
- Viewing Session Properties
- Editing Default Session Properties
- Assigning and Changing Session Ownership
- Canceling Sessions
- Deleting Sessions
- Purging Sessions
- Rescheduling Sessions
- Managing Session Links
- Handling Link Preemption
- Managing Session Resources
- Associating Scripts to Sessions
- Archiving Sessions
- Supporting Layer 2 Switching
- Saving Sessions
- Configuring Session Notifications and Reminders
- Starting and Stopping ASAP Rescheduling
- Managing Virtual Resources
- Chapter 13
- Orchestration Management
- Chapter 14
- Working with Test and Script Execution
- Chapter 15
- Reports
- Chapter 16
- Settings
- Chapter 17
- Dashboard

Using Resource Instances
Inventory Management 5-25
Copying Resource Instances
You can copy resource instances via the Inventory perspective’s Advanced Clone tool. Using the Advanced
Clone tool to copy resource instances speeds the process for creating large numbers of resource instances.
Based on an existing resource instance, the Inventory perspective copies the existing component and
interface configuration, but does not copy any of the existing availability dates. The availability date is set
to the default from the Preferences dialog box. The Keep availability check box option retains the
availability of the source resource.
Key features of the Advanced Clone tool include:
• Supports cutting and pasting
• In addition to the standard Ctrl key combinations, there are three dialog box buttons for cutting,
copying, and pasting.
• There are also undo and redo buttons that allow you to navigate through the lists of generated names.
They function similarly to the Forward and Back buttons in your web browser.
Using the Pattern Generator Tool
The Active System Manager Pattern Generator tool can generate assets and resource names with unique
identifiers. Using a special character string called a range, you can create a long list of names and asset tags
that have either letters or numbers appended to the string.
The format for the range string is (1..9999), (A..Z), (a..z), (AA..ZZ), or (aa..zz). Because uppercase and
lowercase letters are treated as different values, there is a range of 308,915,776 unique letter combinations.
Special characters and punctuation are not supported. You can use any whole numbers in either ascending
or descending order; you can use up to four range strings for an asset tag or name. Hence, if you used the
pattern “Cisco(1..3)” for a resource name, the Inventory perspective generates three names (Cisco1,
Cisco2, and Cisco3).
Note If your range string begins with a single digit (1 to 9), use a zero to force the generator to make the
patterns identical; for instance, Cisco[01..25].
Using multiple range strings creates a geometric progression. A unique pattern is generated for every
possible combination of the ranges. Therefore, if you used the Cisco(Z..X)_Port(01..03) pattern
for an asset tag, the Inventory perspective generates nine asset tags:
• CiscoX_Port01, CiscoX_Port02, CiscoX_Port03
• CiscoY_Port01, CiscoY_Port02, CiscoY_Port03
• CiscoZ_Port01, CiscoZ_Port02, CiscoZ_Port03
There is also a supported modifier for the pattern generator. You can use the percent symbol (%) to limit
the upper limit of a range. For example, the Cisco_(AA..ZZ%C) range only produces names from
Cisco_AA to Cisco_ZC. This modifier works with numeric ranges, but it is only useful for alphabetical
ranges.
Note There must be an equal number of unique asset tags and unique names. Duplicated resource names
are not allowed. If you create duplicate names, an Add Resource Failed error message displays.