
User's Manual
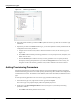


Table Of Contents
- Contents
- About This Guide
- Chapter 1
- Active System Manager Overview
- Chapter 2
- Getting Started
- Chapter 3
- Account Management
- Chapter 4
- User Profile Management
- Managing Security Functions
- Managing Groups
- Defining Permissions
- Modifying Permissions
- Managing Authentication Repositories
- Chapter 5
- Inventory Management
- Understanding Resource Modeling
- Building a Standard Active System Manager Inventory
- Configuring Discovery Setup
- Running Discovery
- Using Resource Types
- Using Resource Instances
- Building Resource Instances
- Modifying Core Properties for Resource Instances
- Modifying Resource Instance Resource Availability Dates
- Modifying Resource Instance Interfaces
- Displaying the Resource Availability Calendar View
- Deleting Resource Instances
- Setting Inventory Parameter Values
- Resolving Resource Dependencies
- Using Resource Interface Types
- Linking Resources
- Importing Inventory
- Importing Connectivity
- Exporting Connectivity
- Managing Resource Pools
- Managing Maintenance Windows
- Managing Virtual Resources
- Chapter 6
- Firmware Management
- Creating Active System Manager Software Repositories
- Updating Dell Chassis Firmware from the Operations Center
- Updating Dell Server Firmware
- Updating Dell Blade/Rack Servers Firmware from the Operation Center
- Updating Dell Blade/Rack Servers Firmware from an Active Session
- Updating Dell Blade/Rack Servers Firmware Using the Attach Server Profile Virtual Operation
- Updating Dell Blade/Rack Servers Firmware through an Orchestration
- Updating Dell Blade/Rack Servers Firmware Using the Attach Server Profile Custom Operation
- Minimum Firmware Versions for Active System Manager Components
- Chapter 7
- Server Template and Profiles
- Creating a Server Template
- Editing a Server Template
- Adding or Editing BIOS Information on a Server Template
- Adding or Editing RAID Information on a Server Template
- Adding or Editing Firmware Settings on a Server Template
- Adding or Editing Networks Settings on a Server Template
- Naming Conventions when using Orchestrations
- Server Profiles
- Chapter 8
- Using Inventory
- Chapter 9
- Repository Management
- Chapter 10
- Network Management
- Chapter 11
- Template Management
- Template Types
- Working with Templates
- Creating New Templates
- Saving Templates
- Changing Template Ownership and Permissions
- Opening Templates
- Closing Templates
- Deleting Templates
- Managing Template History Details
- Filtering Templates
- Validating Templates
- Importing Templates
- Exporting Templates
- Attaching a Template Image
- Scheduling Templates
- Archiving Templates using the Templates View
- Restoring Archived Templates
- Updating Templates using the Template Editor
- Viewing and Modifying Template Properties
- Adding Resource Types
- Setting Resource Type Properties for Scheduling
- Deleting Resource Types
- Adding Resource Types Based on Manufacturer Only
- Adding Resource Instances
- Modifying Resource Properties
- Deleting Resource Instances
- Defining Provisioning Policies
- Supporting Layer 2 Switching
- Using Annotations
- Updating Templates using the Link Editor
- Associating an Orchestration Workflow with Templates
- Chapter 12
- Session Management
- Introducing the Sessions Perspective
- Working with Running Sessions
- Scheduling a Session Using Templates
- Creating an Instant Session
- Opening Sessions
- Opening the Session Editor
- Using the Sessions Calendar
- Viewing Session Properties
- Editing Default Session Properties
- Assigning and Changing Session Ownership
- Canceling Sessions
- Deleting Sessions
- Purging Sessions
- Rescheduling Sessions
- Managing Session Links
- Handling Link Preemption
- Managing Session Resources
- Associating Scripts to Sessions
- Archiving Sessions
- Supporting Layer 2 Switching
- Saving Sessions
- Configuring Session Notifications and Reminders
- Starting and Stopping ASAP Rescheduling
- Managing Virtual Resources
- Chapter 13
- Orchestration Management
- Chapter 14
- Working with Test and Script Execution
- Chapter 15
- Reports
- Chapter 16
- Settings
- Chapter 17
- Dashboard

Using Resource Instances
5-22 Active System Manager User Guide, Release 7.1
Building Resource Instances
You can build a resource instance by copying an existing resource instance, importing one, or creating a
new one. This section describes some of the guidelines you should follow:
• Analyze—Identify what interfaces, other components, properties, and attributes does the resource
instance have. Compile the information into a spreadsheet for reference.
• Copy and Modify—Find the most similar resource instance of that type that already resides in the
Active System Manager inventory and use it as a starting point. Copy that resource instance and make
the changes necessary to the properties and interfaces to match your target resource type.
• Create a New Resource Instance—If copying or importing an existing resource instance is not
practical, you can create a new resource instance within the Active System Manager software.
This section describes how to build a resource instance via the following methods:
• Creating Resource Instances
• Importing Resource Instances
• Copying Resource Instances
• Updating Multiple Resource Instances at Once
Creating Resource Instances
You can use the Inventory perspective to create a new resource instance. You add each of the needed
element types (interfaces, power supplies, console, and so on) and each of the appropriate attributes to your
new resource.
To create a new resource instance, perform the following steps:
1. Select a method to open the New Resource Instance dialog box (see Figure 5-16):
• On the Active System Manager menu bar, click File > New > Resource Instance.
• In the Resource Instances view, right-click any resource type, and select New Resource Instance.
• On the Active System Manager toolbar, click New > Resource Instance.