
Solution Guide


Active System Manager Solution Guide—Active System 800 (AS800)
102
The VM appliance is created with one vNIC. The vNIC needs to be in the Hypervisor Management
Network.
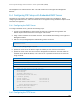
G.4 Configuring PXE Setup with Embedded DHCP Server
The DHCP Services needs to be enabled on separate network interface on the appliance. Before
configuring the DHCP Services, add a new Virtual NIC on the appliance using the VMware vSphere client
and restart the appliance.
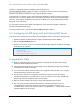
G.4.1 Configuring the DHCP Server
To configure the DHCP server, perform the following steps:
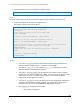
1. Connect to the VM appliance console using the root user credentials through either the
VMware vSphere Client VM console or the Hyper-V VM console.
2. Assign a static IP address on the eth1 interface. This IP Address must belong to the hypervisor
Management subnet.
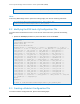
3. Edit file /etc/sysconfig/dhcpd and add following content to the file.
# Command line options here
DHCPDARGS=”eth1”
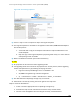
4. Edit the /etc/dhcp/dhcpd.conf file.
5. Update the values of the IP address ranges and subnets per the customer environment.
6. Update the value of the next server with the VM appliance IP address on the same subnet as
the DHCP server (eth0 IP address). The “next-server” represents the TFTP Server where the
image is hosted.
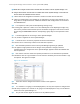
# DHCP Server for Hypervisor management network
# Uncomment following lines with appropriate IP Address range
subnet 192.168.122.0 netmask 255.255.255.0 {
range 192.168.122.102 192.168.122.230;
allow booting;
allow bootp;
filename “pxelinux.0”;
next-server 192.168.122.101;
# --- default gateway
option routers 192.168.122.1;
option subnet-mask 255.255.255.0;
option domain-name-servers 192.168.122.1;
option netbios-node-type 2;
default-lease-time 28800;
max-lease-time 28800;
}
G.4.2 Configuring the TFTP Server