
Install Guide


– Installing the VMware tools—VMware only.
– Installing the puppet agent and ensure that it is congured to run on startup.
* You can install the puppet agent by accessing the agent on the ASM Appliance using the CIFS connection on the guest
operating system or from the \\dellasm\razor folder in the local system.
NOTE: It is recommended that you install the puppet agent version 3.6.2.
* Run the puppet-3.6.2.msi le on the system with the guest operating system using an administrator access.
– Ensure that the ASM Appliance and virtual machine time are synchronized by NTP.
– Ensure that the DNS is congured for dellasm to resolve.
* Update hosts le on the system with the guest operating system to ensure that the guest operating system is able to
resolve ASM Appliance host name dellasm.
NOTE: The hosts le is at C:\Window\System32\drivers\etc.
* To edit the hosts the le, perform the following steps:
a. Open Notepad using the Start menu.
b. Right-click and click Run as administrator.
c. Click File → Open.
d. Navigate to the location of the hosts le and open the le.
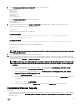
e. Add the following to the hosts le:
<Your ASM IP> dellASM # Dell ASM virtual appliance
f. Ensure that the puppet.conf le is updated conguration to point to dellasm as server.
[main]
server=dellasm
[master]
server=dellasm
[agent]
server=dellasm
NOTE: The puppet.conf le is available at C:\ProgramData\PuppetLabs.
1. Navigate to the /opt/asm-deployer/scripts folder on your ASM Appliance and copy the following les or scripts to the root
folder on the C: drive on the system with the guest operating system:
• puppet_certname.bat
• puppet_certname.rb
NOTE: On a systems running Windows operating system, you can access these les using
ssh
or the
WinSCP
client.
You can also use the following command to copy the les:
$sudo cp puppet_certname.bat
puppet_certname.rb /var/lib/razor/repo-store
This command moves the les to the \\dellasm\razor folder. Then you can access the les using CIFS from the system
with the guest operating system.
• Copy the les to the root folder on the C: drive on the system with the guest operating system.
2. Download the latest version of the following les from https://rubygems.org to the root folder:
• hashie-3.4.6.gem
• inile-3.0.0.gem
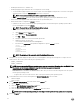
3. Launch Windows Task Scheduler, and create a task. On the General tab,
a. Type the Name in the Name eld.
b. Select the Run whether user is logged on or not option.
c. Select the Run with highest privileges option.
d. Select the operating system name from the Congure for drop-down menu.
NOTE: Ensure that the operating system you select aligns with the guest operating system you are preparing.
4. Click the Triggers tab.
24