
Users Guide

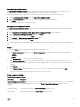


Table Of Contents
- Active System Manager Release 8.3.1 User’s Guide
- Overview
- Getting started with ASM 8.3.1
- Initial Setup
- Dashboard
- Services
- Deploying service
- Add existing service
- Viewing service details
- Editing service information
- Deleting service
- Exporting service details
- Retrying service
- Viewing all settings
- Migrating servers (service mobility)
- Migrating servers
- Upgrading components
- Adding components to an existing service deployment
- Deleting resources from service
- Templates
- Managing templates
- Viewing template details
- Creating template
- Editing template information
- Building template overview
- Building and publishing template
- Importing template
- Exporting template
- Uploading external template
- Editing template
- Viewing template details
- Deleting template
- Cloning template
- Deploying service
- Deploying multiple instances of service
- Adding Attachments
- Decommissioning services provisioned by ASM
- Component types
- Component combinations in templates
- Additional template information
- Managing templates
- Resources
- Resource health status
- Resource operational state
- Port View
- Resource firmware compliance status
- Updating firmware
- Removing resources
- Viewing firmware and software compliance report
- Discovery overview
- Configuring resources or chassis
- Removing discovered resources
- Configuring default firmware repository
- Running firmware compliance
- Configuring global chassis settings
- Configuring unique chassis settings
- Configuring unique server settings
- Configuring unique I/O module settings
- I/O module configuration
- Completing the chassis configuration
- Adding or editing Chassis Management Controller (CMC) user
- Adding or editing Integrated Dell Remote Access Controller (iDRAC) user
- Updating resource inventory
- Viewing resource details
- Understanding server pools
- Settings
- Troubleshooting

Virtual Machine Component
Field Name Description
Name Species the size to allocate for virtual machine hard disk.
Template Species the SCVMM virtual machine template name.
Path Species the storage path where VM clone is deployed.
Networks Species the ASM networks, which are connected to the virtual machine clone.
Block Dynamic
Optimization
If it is True, the block dynamic optimization is enabled. Possible values: True or False.
Highly Available Enables whether the VM is a highly available VM.
Number of CPUs Species the Number of CPUs to allocate to the virtual machine.
Memory in MB Species the memory to allocate to the virtual machine.
Start Action Selects the action to perform automatically when the virtualization server starts.
Stop Action Selects the action to perform when the virtualization server stops.
Deploying customization specication for vCenter virtual machine clone
You can apply customization specication to virtual machines deployed using ASM. A customization spec allows you to create a spec
with settings such as host name, domain name, network settings, static IPs that can be applied to VM clones. Before deploying a
customization spec, ensure that you have created a spec and added it to the vCenter inventory. For more information on creating a
customization spec, see Creating customization specication for vCenter virtual machine clone.
NOTE: Customization specication only applies to VMware virtual machine clone.
To deploy customization specication for vCenter virtual machine clone:
1. Click Templates.
2. Create and edit the template. For more information on creating a template, seeCreating template.
3. On the Template Builder page, click Add VM.
The Virtual Machine Component window is displayed.
4. Select Clone vCenter Virtual Machine from the Select a Component drop-down menu.
5. Under the Associated Resources section, select Associate Selected Resources to associate all or specic components to the
new component.
6. Click Continue.
7. Under Virtual Machine Settings, select or enter all the parameters. For more information on Virtual Machine Settings, see
Virtual Machine Settings.
8. To apply the settings and deploy the customization specication, click Add.
Creating customization specication for vCenter virtual machine clone
To create customization specication:
1. Log in to vCenter.
2. Click Inventory Management Customization Specication Manager.
3. Enter the settings such as host name, domain name, time zone, and network.
4. Click Finish.
57