
Installation Guide
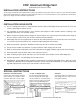

Typical CRV Ridge Vent Installations:
NOTE: Sheath opening must be 1½” on truss construction, 3” on ridge pole construction. If slot is wider than specified, cantilever
roof materials over slot to fully support the nailing flange up to the throat. This holds the vent firmly in place and prevents leakage
at section seams. CRV Ridge Vent is always self-flashing. Felt and shingles are laid up to the slot.
New Construction
Existing
Roofs
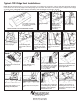
1. Cut ridge slot for ridge
pole or truss construction
as shown inside.
DO NOT EXTEND SLOT INTO OVERHANG OF ROOF.
2. Shingle roof up to
slot.
3. Let top course of
shingles lay over
unslotted portion of
ridge (ends) to form
one thickness.
4. Place CRV Ridge
Vent over open slot.
5. Insert end plugs. 6. Join CRV Ridge Vent
sections with connector
plugs.
7. Extend CRV Ridge Vent
past ends of slot to full
length of ridge. Cut final
section.
8. Align joined CRV Ridge
Vent over slot, fasten in
place.
9. Place straps over joints
and fasten in place. Use
connector straps at each
end of vent run.
1. Carefully remove and discard
cap shingles.
2. Snap chalk line along
centerline of peak.
3. Truss Construction: snap chalk
line ¾” on either side of center-
line to define width of slot. Ridge
Pole Construction: snap chalk
line ¾” on either side of ridge
pole for slot width.
4. Mark end of slot 6” from inside
of end wall. See illustrations for
special applications.
5. Cut through shingles to roof
sheathing with utility knife.
6. Strip away cut-out scrap from
slot.
7. Use power saw to cut through
roof sheathing along chalk lines.
Set depth to avoid cutting into
rafters. Watch for nails.
8. Remove cut out portions of
sheathing. Once slot is cut out,
follow Steps 3 through 9 for New
Construction.
See #4 on front.
3000 W. COMMERCE STREET
DALLAS, TX 75212
800-AIR-VENT (247-8368)
Dade County #01-0105.03
See #4 on front
for slot width.
6”