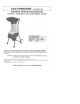
ECO-SHREDDER BY DUROSTAR OWNERS OPERATING MANUAL CHIPPER / SHREDDER / MULCHER MODEL ES1600 SPECIFICATIONS: Horse Power: 2.5HP HopperSize: 15-1/4" x 10-3/8" Side Chute: 1-3/8" x 2-5/16" R.P.M: 3450 THANK YOU FOR PURCHASING AN ECO-SHREDDER, CHIPPER / SHREDDER / MULCHER. Your new Chipper/Shredder/Mulcher has been engineered and manufactured to the highest standards of dependability, ease of use and operator safety. Properly cared for, it will give you years of rugged, trouble-free performance.
RULES FOR SAFE OPERATION 10) The purpose of safety rules is to attract your attention to possible dangers. The safety symbols and the explanations with them require your careful attention and understanding. The safety warnings do not by themselves eliminate any danger. The instructions or warn ings they give are not substitutes for proper accident prevention measures. 11) 12) SAFETY ALERT SYMBOL. Indicates caution or warning. Maybe used in conjunction with other symbols or pbtures.
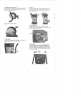
• HANDLE Insert the handle bar into the handle shafts located at the rear of the machine. Align the holes in the handle bar to the holes in the handle shafts and secure with the 2 knobs as shown in Fig. 4 & 5. • ASSEMBLE FRAME & WHEELS Align the holes in the wheels to the holes in the axle section of the frame and secure tightly with the bolts, spring washers and nuts provided as shown in Fig. 1. Affix the hub caps to the wheels. Fig. 2 .
• ATTACHING MULCH BAG Place a heavy duty garbage bag over the lip of the discharge chute and secure into position using a strap. Fig. 8 > DISASSEMBLY I. Unscrew the 3 Top Hopper assembly knobs and remove the Top Hopper assembly. !. Rotate the cutter base counter clockwise and place a piece of wood between the cutter base and the cutting chamber wall so as to stop the cutting base from rotating. Fig. 9 i. Remove the center hold down bolt by turning it counter clockwise using a wrench. t.
• TOP HOPPER - FRONT CHUTE • OVERLOAD PROTECTION AND MOTOR JAMMING If overfeeding clogs the machine the overload protection switch may cut out the motor. To restart, first switch the machine off and disconnect the power cord. Unscrew the 3 Top Hopper assembly knobs and remove the Top Hopper assembly to remove any clogged debris from the cutting chamber.
DUROSTAR POWER EQUIPMENT WARRANTY Subject to the warranty conditions below, this DUROSTAR product, (hereafter called "the Product"), is warranted by DUROSTAR to be free from defects in material and workmanship for a period of 12 months from the date of original purchase covering both parts and labor. Under the terms of this warranty, the repair or replacement of any part shall be at the option of DUROSTAR or its authorized agent.