
Installation guide


20
©
2001
Directed Electronics, Inc.
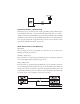
2. Key. Turn the ignition on. (The YELLOW wire, H1/9 must be connected.)
3. Select the receiver channel: Press and release the Valet/Program switch the
number of times necessary to access the desired channel. Press and HOLD the
Valet/Program switch once more. The siren will chirp and the LED will blink
the number of times corresponding to the channel that has been accessed.
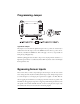
4. Press the transmitter button: While HOLDING the Valet/Program switch,
press the button from the transmitter that you wish to assign to the selected
channel. The unit will chirp once indicating that the channel has been entered.
5. Press the same transmitter button again: While still HOLDING the
Valet/Program switch, press the same transmitter button that you just
programmed. The siren will chirp twice to confirm that the desired channel has
been successfully programmed to the button. If this step is not performed, the
channel will not be programmed to the button. It is not possible to teach a
transmitter button to the system more than once.
6. Release: Once the code is learned, the Valet/Program button can be released.
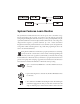
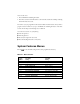
Channels 4-6 (available only when using a Radar Master remote)
Channels 4 through 6 are used to assign the arm, disarm and panic functions to separate buttons
Channel Number Function Wire Color
1 Arm/Disarm/Panic
2 Silent Mode/Remote Valet/Trunk Release RED/WHITE
3 Remote Start or other accessories WHITE/BLUE
4 Arm only (only available with Radar Master remote)
1
5 Disarm only (only available with Radar Master remote)
1
6 Panic only (only available with Radar Master remote)
1
7 Auto-learn 3-Button Transmitter Configuration
2
8 Auto-learn 4-Button Transmitter Configuration
2
9 Zap (delete all transmitters)
3
1
NOTE: Channels 4-6 are only available when using an optional Radar Master remote.
2
NOTE: For Auto Learn Configurations, see Transmitter Configurations section of this guide.
3
NOTE: See Channel 9 description in this section.