
Installation guide

10
©
2001
Directed Electronics, Inc.
H2/B BLACK/WHITE input to domelight supervision relay
This wire determines what the output polarity of H1/4 will be. If the door pin circuit is negative,
connect to chassis ground. If the it is positive, connect to a fused 12V source.
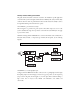
H2/C - H2/H power door locks
The system has door lock relays on-board, and can directly interface with most electric power door
lock systems drawing 30 amps or less. It can also drive aftermarket actuators directly. (Some vehicles
with Type D locks require that an aftermarket actuator be added to the driver’s door to allow system
control.)
For detailed instructions on wiring the vehicle’s door locks, please refer to the Door Lock Wiring
Guide provided on the
wwwwww.. ddiirreecctteecchhss..ccoomm
website or through
DDiirreeccttFFaaxx 11-880000-999999-11FFAAXX ((11332299))
.
Plug-In Harnesses
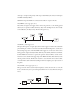
Super Bright LED, 2-Pin White Plug
The super bright LED operates at 2V DC. Make sure the LED wires are not shorted to ground as
the LED will be damaged. Multiple LEDs can be used, but they must be wired in series. The LED
can be top-mounted or flush-mounted. If top-loading the LED with a bezel, the LED fits into a
5
/
16
-inch mounting hole. If flush-mounting the LED from the back of a panel, drill a mounting hole
using a
17
/
64
-inch drill bit. Be sure to check for clearance prior to drilling the mounting hole.
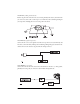
Valet/Program Switch, 2-Pin Blue Plug
The Valet/Program switch should be accessible from the driver’s seat. It plugs into the blue port on
the side of the unit. Since the system features Valet by using the remote transmitter, the switch can
be well hidden. Consider how the switch will be used before choosing a mounting location. Check
for rear clearance before drilling a
9
/
32
-inch hole and mounting the switch.The GRAY wire in the
two-pin plug may also be used as a (+) ghost switch input and can be connected to any (+) switch
in the vehicle. (See Feature Descriptions section of this guide.)