
Installation guide


28
©
2001
Directed Electronics, Inc.
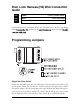
4.
TTrraannssmmiitt..
While HOLDING the Valet/Program switch, press the button from
the transmitter that you wish to assign to that channel. The unit will chirp
indicating that the channel has been entered.
5.
CCoonnffiirrmm..
While still HOLDING the Valet/Program switch, press the same
transmitter button that you just programmed. The unit will chirp twice to
confirm that the desired channel has been successfully programmed to the button.
If this step is not performed, the channel will not be programmed to the button.
It is not possible to teach a transmitter button to the system more than once.
6.
RReelleeaassee..
Once the code is learned, the Valet/Program switch can be released.
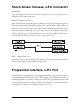
Channels 5, 6 and 7 (available only when using a Radar Master remote)
Channels 5 through 7 are used to assign the arm, disarm and panic functions to separate buttons
on the remote control. These channels are only available when using an optional Radar Master
remote. (See Transmitter Configurations section of this guide.) Teaching a transmitter button to
Channel 5 erases all previous programming from the transmitter’s memory. Similarly, if the trans-
mitter is set up to use the separate arm, disarm and panic channels and a button from that
transmitter is programmed to Channel 1, the transmitter’s memory will be erased, and the system
will only recognize the button that was programmed to Channel 1.
Channel 9
If any transmitter button from a known transmitter is programmed to Channel 9, all transmitters
will be erased from memory and will revert to the default feature settings (see the Features Menu
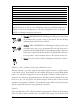
Channel Number Function Wire Color
1 Arm/disarm/panic
2 Chirp muting/remote controlled Valet/trunk release RED/WHITE
3 Remote start
4 Auxiliary output VIOLET/BLACK
5 Arm only (only available with Radar Master remote)
1
6 Disarm only (only available with Radar Master remote)
1
7 Panic only (only available with Radar Master remote)
1
8 Auto-learn 4-button transmitter configuration
2
9 Zap (delete all transmitters)
3
1
NOTE: Channels 5, 6, and 7 are only available when using an optional Radar Master remote.
2
NOTE: For Auto Learn Configurations, see Transmitter Configurations section of this guide.
3
NOTE: See Channel 9 description in this section.