FabricSmart™ clothes washer Installation instructions and User guide NZ AU SG
Intelligence working for you The FabricSmart™ washer is born from 75 years of Fisher and Paykel laundry innovation. With sophisticated electronics and a revolutionary direct drive motor, it cleans and cares for your clothes as never before. Unlike conventional machines, FabricSmart™ clothes washers use intelligence to continually adapt the wash action and water levels to save on water and electricity use; making it kinder on your wallet and the environment.
Contents Installation instructions Before you do your first wash Getting started quickly Wash options How Dirty, Washer feedback Eco Active™ wash Lid lock Water consumption The Lifestyles/Options button Selecting, Customising Options Temperature, Water Level Wash Advance, Spin, How Dirty, Delay Start, Drip Dry, Soak, Save Time Save Water, Traditional Wash, Settings Adjusting the wash settings Wash Temp, Auto Water Level Default Rinse, Easy Iron Spin Speed, Out Of Balance Recovery End of Cycle Beeps, Re-set
2 Installation instructions Unpacking To ensure the best performance from your new FabricSmart™ washer please follow the instructions below. 1 2 3 4 5 6 Removing the packaging Remove the outer packaging. Tilt the machine backwards and walk it off the bottom packer one foot at a time. Remove the bottom packer from under the machine by pulling it out the front. Lift the lid and remove the bowl packer from the bowl. Remove the hoses and accessories.
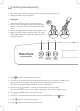
Installation instructions 3 Inlet hoses 1 2 Note: new hose sets provided with the machine are to be used to connect the washer to the water mains. Old hose sets should not be re-used. Connect the straight ends of the inlet hoses to the taps (there are washers fitted in both ends). Connect the red connector hose to hot, and blue connector hose to cold (if your hoses are colour-coded). Connect the elbow ends of the inlet hoses to the corresponding machine Tap end Machine end inlet valves. Fig.
4 Installation instructions Water supply ■■ ■■ ■■ ■■ ■■ For best operating conditions your hot water should be approximately 65°C. Your hot water should not exceed 75°C or your cold water exceed 35°C. Temperatures above these may cause the machine to fault or cause damage to the machine. If you have an uncontrolled water-heating source (eg a wet back or solar heating) you should have a tempering device fitted. This will ensure the hot water temperature remains within safe limits.
Before you do your first wash 5 Thank you for buying a Fisher & Paykel FabricSmart™ washing machine. We are very proud of this washer and trust it will serve you well for many years. At Fisher & Paykel we aim to provide innovative products that are simple to use, ergonomic and energy efficient. Thousands of tonnes of washing and 75 years of laundry experience have been programmed into your washing machine to help give you the best possible performance.
6 ■■ ■■ 1 ■■ ■■ ■■ ■■ Getting started quickly Place load evenly around the agitator (refer to Sorting and Loading, page 23). Remove the fabric softener dispenser. Detergent Follow the instructions on the detergent package. Use the mark on the agitator nearest to the top of the clothes as a guide to the correct amount of detergent to use. Pour the detergent down the centre of the agitator stem. Replace the fabric softener dispenser (this stops small articles falling down the centre of the agitator).
Getting started quickly Wash progress As the washer progresses through the cycle the following symbols will be shown on the display screen to indicate progression Filling Eco Active Wash 3 Sensing Water Level 4 Sensing Fabric Type Wash 7 Spray Rinse Deep Rinse Spin Delay Start 8 Fig.7 FabricSmart™ clothes washer control panel Wash cycles There are four Fabric Care cycles and 13 specially designed Lifestyles cycles to make washing simpler and easier.
8 Wash options How Dirty? Your FabricSmart™ washer will automatically choose the medium soil level (three HOW DIRTY bars). This setting has been designed for your average, everyday load. However, some loads may need more or less washing depending on the amount of soil on the clothes. For example, a load of dirty jeans will need the soil level increased while a bath towel used only once will only need a low soil level. Fig.
Eco Active™ wash 9 Eco Active™ wash The Eco Active™ wash, is a unique washing method that uses a combination of front loader and top loader washing technologies. This dual action wash gives excellent wash performance and means you retain the convenience and capacity of a top loading machine while introducing the gentle cascade wash action and energy efficiency of a front loader.
10 Lid lock Your FabricSmart™ has a lid lock, which locks when your machine is spinning. This ensures the lid cannot be opened during hazardous parts of the cycle, providing added safety for you and your family. Fig.11 Lid lock in use A Lid lock symbol ( ) appears in the corner of the screen when locked (it disappears when unlocked), letting you know at a glance if you can open the lid or not.
Water consumption 11 Hot water consumption Differences in hot water for a Warm/Cold wash. Machine size* Load size Large Medium Eco Active™ wash Traditional wash 5 Kg 13 L 33 L 3 Kg 10 L 23 L 1 Kg 7L 13 L 5 Kg 12 L 29 L 2.5 Kg 9L 23 L 0.7 Kg 6L 12 L † * To check what size your washer is, look on the rear of the topdeck where the word “Large” or “Medium” will be embossed.
12 The Lifestyles/Options button FabricSmart™ allows you to customise your wash by using the following menus: OPTIONS; LIFESTYLES; WASH ADVANCE and TEMPERATURE. 1 2 3 4 Fig.13 The wash options OPTIONS – allows you to select different wash settings for your wash (refer below). LIFESTYLES – is a range of specially designed cycles to make washing even easier (refer to page 19). WASH ADVANCE – lets you select what part of the cycle you wish to start from (refer to pages 14 and 22).
Options 13 For all the options mentioned below you firstly need to enter the OPTIONS menu (touch , and select OPTIONS). Use the and buttons to move through the options until the one you want is highlighted. Touch to select it or to go back to the previous step.
14 Options Wash Advance Use WASH ADVANCE to advance the cycle or to start the cycle at a particular stage. This is a good option if you only want to use part of the cycle, eg the rinse and spin, or prewash. Please refer to page 22 for more detail. Note: you can also access this option from the wash options screen (touch the button). Spin This option allows you to limit the spin speed to either fast (1000 rpm) or medium (670 rpm).
Options 15 Save Water FabricSmart™ provides an excellent opportunity to save water, with two water saving options available: 1) the traditional SAVE WATER option, and 2) the ECO (SAVE WATER++) option. SAVE WATER minimises the amount of water used. The rinse type your washer chooses depends on the type of fabric you are washing and the options you have chosen.
16 Adjusting the wash settings After using your FabricSmart™ washer you may want to fine-tune some of the options to suit your wash needs. To access the Settings menu: ■■ ■■ ■■ ■■ Touch , select OPTIONS and then SETTINGS. The SETTINGS menu will then be displayed. Select the option you wish to adjust. Adjust the option to your preferred setting, then touch . This option will be permanently set. To adjust the setting again, repeat the above steps. To exit SETTINGS, touch . Fig.
Adjusting the wash settings 17 Default Rinse This menu changes the rinse option that is automatically selected when you first turn your machine on. Spray and Deep is the default rinse. You may wish to change the type of rinse selected for a number of reasons. If you have a problem with impurities in your water supply you may get a better wash if you change the rinse option to two deep rinses. If you want to conserve water you could change the rinse option to a single deep rinse or a shower rinse.
18 ■■ ■■ ■■ ■■ Adjusting the wash settings Your machine left the factory with the Machine Stops Action set as the default. To set your machine to Automatic Recovery: Access the SETTINGS menu (refer to page 16). Select OUT OF BALANCE RECOVERY. Select ON. Automatic Recovery is now activated. End of Cycle Beeps The beeps signalling the end of the cycle can be set to zero, five or fifteen. ■■ ■■ ■■ Access the SETTINGS menu (refer to page 16). Select END OF CYCLE BEEPS.
Lifestyles cycles 19 2. Lifestyles Your FabricSmart™ has a range of specially designed Lifestyles cycles to make washing even easier. 1 2 Touch the button, select LIFESTYLES. The LIFESTYLES menu will be displayed. Select a Lifestyles menu of your choice, eg FAMILY. Fig.19 Lifestyles options Note: WA10T65F and WA85T60F default to a cold water temperature. You can manually adjust the temperature if the machine is connected to a hot water source.
20 Lifestyles cycles Favourite The FAVOURITE cycle lets you save wash settings for your ideal wash cycle. Your FAVOURITE cycle can include most wash options and it can start from any point in the cycle. For instance, it may be a cycle to wash your gym gear or it may be a rinse and spin to rinse out swimsuits. 1 2 3 Fig.
Lifestyles cycles 21 Sports Sweaty The clothes you exercise in require a little extra care to remove the odours and dirt that tend to penetrate into the fabric structure. This cycle incorporates a warm/hot regular wash with a fast spin to clean sweaty sports clothes. Fig.23 Lifestyles Sports menu Muddy Clothes that have mud on them need to be washed in a special way so all traces can be removed. Mud requires a cold water wash with lots of dilution.
22 Wash Advance and Temperature Fruit/Wine It is important to treat these stains immediately with soda water if you have it, or cold water. The FRUIT/WINE cycle will finish off the process. Some detergents contain colour-safe bleaches, that would be ideal here as the higher temperatures in the Eco Active™ wash activate the bleaches. This wash has a warm/hot Eco Active™ wash with a warm agitate, a spray and deep rinse, and a fast spin.
Sorting and loading 23 To get the best wash results it pays to sort your clothes before washing. Care labels Care labels will tell you about the fabric of the garment and how it should be washed. Read them carefully. Soil Sort clothes according to the type and amount of soil. Some soils suit warmer washes (eg oily soils), while others are best washed in cold water (eg mud, blood). Refer to Lifestyles, pages 19 – 22.
24 Washing difficult items Washing woollens The WOOL cycle is for washing MACHINE WASHABLE woollens. The fibres of these woollens have been treated to prevent felting when they are machine-washed. Most hand knitted garments are not made of machine washable wool and we recommend that you wash them by hand. ■■ ■■ ■■ ■■ ■■ Check the care label. Use a wool detergent. Hand washed woollens may be spun in your washer. To dry woollens lie them flat on a towel and pat into shape. Dry out of direct sunlight.
Detergent 25 Choosing the right detergent We recommend the use of domestic detergents (powder or liquid) only. Soap flakes or granulated soap powders should not be used. Detergents that contain built-in fabric softeners may not be suitable for your FabricSmart™ as they can leave deposits on the agitator and bowl.
26 Detergent How much to use? Concentrate Powder Machine size Medium Large Water level/load High Medium high Medium Number of scoops 1 1/3 scoops 1 ½ scoops 1 heaped scoop 1 1/3 scoops 1 scant scoop 1 scoop Medium low 2/3 scoop ¾ scoop Low ¼ scoop 1/3 scoop Standard powder Machine size Medium Water level/load High Large Based on a metric cup 1 cup 1 cup Medium high ¾ cup 1 cup Medium 2/3 cup ¾ cup Medium low ½ cup ½ cup Low ¼ cup 1/3 cup Liquid Machine size Medium Water
Fabric softener 27 How the fabric softener is dispensed The fabric softener goes into the dispenser on the top of the agitator. During rinse the machine spins to release the fabric softener, delivering it down the agitator stem as the machine fills for the final deep rinse. Note: the SAVE WATER and ECO (SAVER WATER++) rinse options are not designed to be used with fabric softener. How much fabric softener? Fig.
28 Caring for your clothes washer When you have finished the cycle ■■ ■■ Turn off the taps to prevent the chance of flooding should a hose burst. Unplug the machine from the wall socket. Cleaning your FabricSmart™ Before you start cleaning your FabricSmart™ washer, ensure that it is turned off at the wall. ■■ ■■ ■■ Use a soft damp cloth and wipe dry. Do not use chemical or scouring cleaners as they can damage the paint and plastic surfaces.
Machine information 29 Specifications * Machine size Depth/Width Height* Height (lid open) Large 650 mm 1020 – 1050 mm 1410 – 1440 mm Medium 600 mm 1020 – 1050 mm 1360 – 1390 mm Height is measured to the highest point on the console. Note: exact height of your FabricSmart™ is dependent on how far the feet are inserted into the base of the machine. ■■ ■■ ■■ Electrical supply: 220 – 240 V, 50 Hz Sinusoidal, 165 W Inlet water pressure: Max. 1 Mpa (150 psi), Min.
30 If your FabricSmart™ beeps for help Before you call for service Please read the following pages before calling for service. You can correct many of your machine’s problems using the checklists on the following pages. Your machine is capable of diagnosing its own problems and if it has a problem it will beep and display a message telling you what is wrong. Musical series of beeps* every 5 seconds and… possible solutions * The same sound your washer makes when you turn it on at the wall.
If your FabricSmart™ beeps for help 31 “I am not getting any WATER” The taps have not been turned on. Inlet hose screens may be blocked. The hoses may be kinked (refer to page 3). The drain hose is too low or the drain hose is pushed into the standpipe too far and the water is siphoning out of the machine (see Installations Instructions, page 2). The flow rate of the supply water is too slow. “I am OVERLOADED” The machine is overloaded and can not agitate. Ensure the machine is stationary.
32 Operating problems Pressing POWER does not turn the machine on. Is the power switched on at the wall? Unplug the machine from the wall. Wait 60 seconds, plug back in and turn the power back on again. Could your household power supply be at fault? Try plugging in another electrical appliance. Pressing START/PAUSE does not start the fill. Are both hot and cold taps turned on? Are the inlet hose screens blocked? FILLING continuously. Check that the machine is not siphoning (refer to page 2).
All about wash problems 33 Listed below are possible causes and solutions to some common wash problems. CREASING. Overloading the washer or dryer. Select EASY IRON as this will change the rinse and select a slower, shorter spin speed (page 19). Or change the fast spin speed from 1000 rpm to 670 rpm (refer to Spin, page 14). Do not leave wet clothes to sit in the washer or laundry basket. POOR SOIL REMOVAL. Not enough detergent for load size or amount of soil on the clothes. Overloading the washer.
34 Manufacturer’s Warranty You automatically receive a 2 year Manufacturer’s Warranty with the purchase of this Product covering parts and labour for servicing within the country of purchase. Fisher & Paykel undertakes to: Repair or, at its option, replace without cost to the owner either for material or labour any part of The product, the serial number of which appears on the product, which is found to be defective within TWO YEARS of the date of purchase.
Manufacturer’s Warranty 35 E Normal recommended maintenance as set out in the product’s user guide. F Repairs when the appliance has been dismantled, repaired or serviced by other than a Fisher & Paykel authorised repairer or the selling dealer. G Pick-up and delivery. H Transportation or travelling costs involved in the repair when the product is installed outside the Fisher & Paykel Authorised Repairer’s normal service area.
36 Customer Care Before you call for service or assistance… Check the things you can do yourself. Refer to your User Guide and check: 1 2 3 Your appliance is correctly installed. You are familiar with its normal operation. You have read the problem solving section at the back of the book. If after checking these points you still need assistance, please refer to your nearest Fisher & Paykel Authorised Repairer, or contact us through our local website listed on the back cover.
Customer Care Product details Fisher & Paykel Appliances, Ltd Model/Serial No.
www.fisherpaykel.co.nz www.fisherpaykel.com.au www.fisherpaykel.com.sg Copyright © Fisher & Paykel 2011. All rights reserved. The product specifications in this booklet apply to the specific products and models described at the date of issue. Under our policy of continuous product improvement, these specifications may change at any time. You should therefore check with your Dealer to ensure this booklet correctly describes the product currently available. NZ AU F&P PN - 424120 05.