SuperCube® 4000/6000 Owner’s Manual Manual del usuario Guide d’utilisation
english Thank you for choosing the Definitive Technology SuperCube subwoofer. In order to ensure that you experience the finest performance possible, we encourage you to take a moment to fully read this owner’s manual and familiarize yourself with the proper installation and setup procedures for your SuperCube speaker. Enjoy. español Le agradecemos que haya elegido el subwoofer SuperCube de Definitive Technology.
Contents Índice Safety Precautions . . . . . . . . . . . . . . . . . .4 Medidas de seguridad . . . . . . . . . . . . . . .4 Précautions de sécurité . . . . . . . . . . . . . . . 4 Unpacking Your Loudspeakers . . . . . . . . .5 Desembalaje de las bocinas . . . . . . . . . . .5 Déballage du caisson de basse . . . . . . . . . 5 Placing the SuperCube . . . . . . . . . . . . . . .6 Colocación del SuperCube . . . . . . . . . . . .6 Positionnement du SuperCube . . . . . . . . .
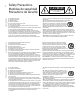
CAUTION english 1. Read these instructions. 2. Keep these instructions. 3. Heed all warnings. 4. Follow all instructions. 5. Do not use this apparatus near water. 6. Clean only with dry cloth. 7. Do not block any ventilation openings. Install in accordance with the manufacture’s instructions. 8. Do not install near any heat sources such as radiators, heat registers, stoves, or other apparatus (including amplifiers) that produce heat. 9. Do not defeat the safety purpose of the polarized or grounding plug.
Unpacking Your Loudspeakers Desembalaje de las bocinas Déballage du caisson de basse 5 Ultra-Compact, Ultra-Performance Powered Subwoofer Su erCube 4000 ® V22 Ultra-Compact, Ultra-Performance Powered Subwoofer Su erCube 6000 ® WIRELESS READY V22 WIRELESS READY english Each subwoofer leaves our plant in perfect condition.
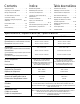
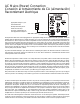
SuperCube potential locations TV & Center Speaker english Right Speaker There are some general guidelines that you should bear in mind when locating your subwoofer: 1. For best results, place the subwoofer on the same side of the room as your front speakers. 2. Placement near walls and in a corner will increase the subwoofer’s output, but may sound “muddy” or “boomy.” 3. An acoustic effect called “standing waves” or “room modes” may cause uneven bass at various locations throughout the room.
AC Mains (Power) Connection Conexión al tomacorriente de CA (alimentación) Raccordement électrique 7 Appropriate voltage for your unit indicated here El voltaje adecuado para la unidad se indica aquí La tension d'alimentation de votre appareil est indiquée ici english The SuperCube subwoofer must be plugged into an appropriate voltage (use an unswitched outlet if possible). Check the amplifier plate to determine the AC voltage required by your unit.
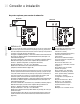
Connection & Setup There are four options for connecting your subwoofer: RECEIVER RECEIVER RECEIVER english PREAMP OUT 1 LFE INPUT 1A (This method is recommended for home theater systems with receivers that do not allow low-pass filter [crossover] and high-pass filter frequencies to be set independently. It uses the low-pass filter built into the receiver and bypasses the one built into the subwoofer.) 1. Power-off the amplifier/receiver and disconnect the subwoofer from the AC socket. 2.
RECEIVER RECEIVER 3 SPEAKER LEVEL IN (best for amps/receivers with no LFE/subwoofer or pre-out jacks) 1. Power-off the amplifier/receiver and disconnect the subwoofer from the AC socket. 2. Connect standard speaker cables from the speaker output terminals of the amplifier/receiver. Most amplifiers and receiver speaker terminals allow two sets of wires to be connected to one terminal set (one for the main speaker and one for the subwoofer).
Conexión e instalación Hay cuatro opciones para conectar el subwoofer: RECEPTOR RECEPTOR RECEIVER español PREAMP OUT 1 ENTRADA LFE 1A (Se recomienda este método para sistemas de cine en casa con receptores que no permiten ajustar frecuencias de filtros de paso bajo [de cruce] y de paso alto de forma independiente. Este método utiliza el filtro de paso bajo incorporado en el receptor en lugar de utilizar el del subwoofer.) 1.
RECEPTOR RECEIVER 3 7. Ajuste las bocinas derecha e izquierda frontales a “Large” (Grande). 8. Para ajustar el subwoofer y optimizar el sistema, vaya a la página 17. ENTRADA DE NIVEL DE BOCINA (recomendado para amplificadores/receptores sin tomas de salida o LFE/Subwoofer) 1. Apague el amplificador/receptor y desconecte el subwoofer del tomacorriente. 2. Conecte los cables simples de las terminales de salida de bocinas del amplificador/receptor.
Branchement et configuration Le branchement de votre caisson de basse peut s'effectuer de quatre manières différentes : RECEPTEUR RECEPTEUR RECEIVER français PREAMP OUT 1 ENTRÉE LFE 1A (Cette méthode est recommandée pour les systèmes de cinéma maison dont l'amplificateur/récepteur ne permet pas de régler indépendamment les fréquences de coupure du filtre passe-bas et du filtre passe-haut.
RECEPTEUR RECEIVER 3 ENTRÉE HAUT NIVEAU 6. Indiquez « Non » ou « Désactivé » à la rubrique Caisson de basse/subwoofer. 7. Configurez les haut-parleurs frontaux gauche et droit en « Large ». 8. Reportez-vous à la page 17 pour les réglages du caisson de basse et ceux du système. (meilleur choix pour les amplificateurs/récepteurs dépourvus de sortie LFE/subwoofer ou de sortie préampli) 1. Éteignez l'amplificateur/récepteur et débranchez le caisson de basse de la prise de courant. 2.
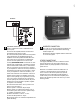
Adjusting & Using the SuperCube Subwoofer Ajuste y uso del subwoofer SuperCube Volume, LP Filter, Phase and EQ controls are duplicated on the amp panel. 1 8 2 7 3 6 4 english 5 Remote Guide The supplied remote control is attached to the amp panel with a hook and loop fastener; pull to remove it. The remote is the best tool for perfectly adjusting your subwoofer to achieve perfect seamless blending with your main speakers.
El volumen, el filtro de paso bajo, el filtro de paso alto y los controles de ecualización se duplican en el panel amplificador. 1 8 2 7 3 6 4 5 El control remoto provisto está unido al panel amplificador con una cinta de velcro: tire de él para retirarlo. El control remoto es la mejor herramienta para regular el subwoofer a fin de lograr una integración perfecta con las bocinas principales.
Réglages et utilisation du caisson de basse SuperCube Les commandes de volume, de fréquence de coupure, de phase et d'égalisation sont également présentes sur la plaque de 8 l'amplificateur 1 2 7 3 6 4 français 5 Guide d'utilisation de la télécommande La télécommande fournie est fixée à la plaque de l'amplificateur au moyen d'une attache à boucle et crochet; tirez dessus pour la dégager.
Adjusting for Best Performance 1. Sit in your favorite listening position with remote in hand. 2. Play a piece of music you are very familiar with that has good deep bass content. 3. Adjust the Volume up or down to taste. The bass should have impact without sounding too “heavy”. 4. Using the LP & HP Filter Guide on page 18 as a starting point, adjust the LP up or down until there is a smooth transition between main speaker and subwoofer. Play a recording with male vocals and string bass.
LP & HP Filter Guide Guía de filtros de paso bajo y paso alto Réglage des filtres passe-haut et passe-bas Type de haut-parleur principal Suggested LP & HP Crossover Setting Ajuste recomendado de los filtros de cruce de paso bajo y paso alto Fréquence de coupure suggérée des filtres passe-bas et passe-haut Large, full-range floorstanding De pie, de espectro completo, grande Gros haut-parleur en colonne 40Hz – 80Hz 40 Hz - 80Hz 40 Hz à 80Hz Small floor-standing & large bookshelf De pie y pequeña o par
Service Mantenimiento y reparaciones Service après-vente 19 Service and warranty work on your Definitive loudspeaker will normally be performed by the Definitive Technology dealer or importer. If, however, you wish to return the speaker to us, please contact us first, describing the problem and requesting proper authorization. NOTE: Definitive phone and email technical support offered only in English.
Warranty 20 Limited Garantía limitada english 5-Years for Drivers and Cabinets, 3-Years for Electronic Components DEI Sales Co.