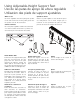
Mythos® XTR®-SSA3 Owner’s Manual Manual del Usuario Guide d’utilisation
english español français Thank you for choosing a Definitive Technology Mythos XTR-SSA3 Loudspeaker System. In order to ensure that you experience the finest performance possible, we encourage you to take a few moments to fully read this owner’s manual and familiarize yourself with the proper installation and setup procedures for your Mythos XTR speakers. Enjoy. Unpacking your loudspeaker Please unpack your speaker carefully. Please inspect for shipping damage.
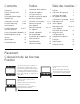
Contents Índice Table des matières 3 Placement 3 Colocación de las bocinas 3 Position 3 Using L-Bracket Shelf Supports 4 Uso de los soportes en L para estantes 4 Utilisation des équerres 4 5 5 Utilisation des pieds de support ajustables 5 Uso de las patas de apoyo de altura regulable Using Adjustable-Height Support Feet Connexion et montage 6 et 7 6&7 Conexión e instalación 6y7 On-Wall Mounting (with bracket) 8&9 8y9 Montage mural (avec support) 8 et 9 Montaje en pared (con so
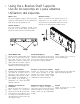
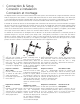
Using the L-Bracket Shelf Supports Uso de los soportes en L para estantes Utilisation des équerres When to Use Use these adjustable supports when placing the speaker on a shelf below the TV. They allow you to angle the speaker up towards ear level. english Attach Rubber Pads Remove the two supplied rubber pads from the accessories bag. Peel the paper from the back of the pads exposing the adhesive.
Using Adjustable-Height Support Feet Uso de las patas de apoyo de altura regulable Utilisation des pieds de support ajustables When to Use Use these adjustable feet when placing the speaker on the same shelf as the TV. They allow you to raise the speaker over the TV’s shelf stand. Cuándo utilizarlas Use estas patas regulables cuando coloca la bocina en el mismo estante del televisor. Le permiten elevar la bocina por encima del nivel del estante.
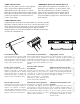
Connection & Setup Conexión e instalación Connexion et montage The Mythos XTR wire connection method is different than other speakers. The XTR-SSA3 has a single terminal block connector with one input pair for each channel — Left Front, Right Front and Center. To aid in channel identification, each channel pair is color-coded and color bands are supplied. Make sure you connect positive (+) to positive (+) and negative (–) to negative (–) from receiver outputs to speakers on all channels.
Bocinas de sonido envolvente Si decide utilizar bocinas de sonido envolvente con el sistema Mythos XTR-SSA3, le sugerimos las bocinas Mythos XTR-20BP o Mythos Gem para obtener una integración perfecta de los sonidos. Conéctelas a las salidas (laterales) del receptor para bocinas de sonido envolvente. Compruebe la polaridad correcta de la conexión de los cables (positivo (+) a positivo (+) y negativo (-) a negativo (-)) durante la conexión de las bocinas XTR-SSA3.
On-Wall Mounting (with bracket) Montaje en pared (con soporte) Montage murale (avec support) The Mythos XTR loudspeaker was designed to wall-mount near your thin wall-mounted television. A bracket has been supplied to make wall-mounting easier. La bocina Mythos XTR está diseñada para colgarse junto a un televisor montado en la pared. Se incluye un soporte para facilitar el montaje en la pared. english Use the Supplied Template A cardboard mounting template is provided.
*NOTE* Measure Twice Make sure the speaker clears the ceiling, adjacent walls, corners, beams, lighting fixtures and door/window frames. Leave at least 1" (25mm) above or to the side of the speaker location to allow the speaker to slide onto the screws. Make sure the center of the template is centered with the TV screen’s center points.
On-Wall Mounting (without bracket) Montaje en pared (sin soporte) Montage mural (sans support) It is possible to wall-mount an XTR loudspeaker without the supplied bracket. Simply procure the appropriate screws for your installation to carry the speaker weight and follow these steps. Es posible montar una bocina de la serie XTR en la pared sin el soporte provisto. Compre los tornillos adecuados para cargar el peso de la bocina y siga estos pasos.
*NOTE* Measure Twice Make sure the speaker clears the ceiling, adjacent walls, corners, beams, lighting fixtures and door/window frames. Leave at least 1" (25mm) above or to the side of the speaker location to allow the speaker to slide onto the screws. Make sure the center of the template is centered with the TV screen’s center points.
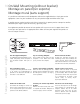
Using a Powered Subwoofer Uso del subwoofer con amplificador Utilisation d’un caisson des graves actif The Mythos XTR series performs best when complemented with a powered subwoofer. Definitive offers a number of suitable subwoofers to pair with your Mythos XTR loudspeakers. La serie Mythos XTR obtiene su máximo rendimiento cuando se la complementa con un subwoofer con amplificador. Definitive ofrece varios subwoofers que funcionan perfectamente con las bocinas Mythos XTR.
Receiver/Speaker Setup Instalación de las bocinas Configuration du récepteur/haut-parleur 1. In the Speaker Setup/Configure function of your receiver, set Left, Center and Right channels to “Small.” 2. Select “Yes” when asked if you are using a subwoofer. 3. Set the Left, Center and Right crossover frequency on the receiver to 100Hz if your speaker is wall-mounted or 120Hz if it is shelf-mounted. 4. In the receiver’s “Speaker Distance” Setup Menu, select the same distance for all channels.
Service Mantenimiento Entretien Service and warranty work on your Definitive loudspeaker will normally be performed by the Definitive Technology dealer or importer. If, however, you wish to return the speaker to us, please contact us first, describing the problem and requesting proper authorization. NOTE: Definitive phone and email technical support offered only in English.
Specifications Especificaciones Spécifications Number of Channels Cantidad de canales Nombre de canaux 15 3 43"L x 15⁄8"D x 51⁄4"H Dimensions Dimensiones Dimensions 109.2cm L x 4cm D x 13.2cm H Driver Complement Bocinas Haut-parleurs 6 each 31⁄2" (90mm) XTDD dome mid/bass drivers; 3 each 1" (25mm) Pure Aluminum Dome Tweeters 6 bocinas XTDD de medios/graves de 31⁄2" (9cm) y domo cada una; 3 tweeters de domo de aluminio puro de 1” (2.
Warranty 16 Limited Garantía Limitada english 5-Years for Drivers and Cabinets, 3-Years for Electronic Components DEI Sales Co.