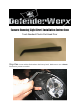
Camaro Running Light Bezel Installation Instructions Tools Needed: Plastic Flat Head Prior Step One: Insert rubber flat head into the factory bezel. Make sure to use a Plastic Flat head to prevent scratches.
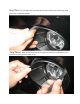
Step Two: Once the flat head is inserted into the bezel, slide prior into factory bezel and create a separation pocket. Step Three: Slide the flat head around the edges of the factory bezel and use your free hand to gently pull the bezel loose.
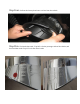
Step Four: Pull out the factory bezel once it is free from the vehicle. Step Five: The Bezel that reads, “Top RH” is for the passenger side of the vehicle, and the bezel that reads “Top LH” is for the driver’s side.
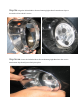
Step Six: Align the DefenderWorx Chrome Running Lights Bezel’s attachment clips to the inside of the vehicle’s crevice. Step Seven: Insert the DefenderWorx Chrome Running Light Bezel into the crevice. Attachment clips should press firmly into place.
Final Step: Enjoy your new DefenderWorx Chrome Running Light Bezel!