
Installation Guide

-2-
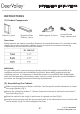
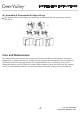
(1) Product Components
For your safety and to prevent property damage, please thoroughly read and follow all
installation instructions before installing this product. Wear safety goggles during the
installation process. It is imperative to install this product in accordance with all applicable
state and local plumbing and building codes. If you are unsure about the correct installation
procedure, we strongly recommend consulting a professional.
Please measure the cabinet yourself to determine its overall dimensions. For recessed models,
identify the rough-in dimensions. While a chart is provided, we recommend measuring
independently for the most accurate information.
WARNING:
Dimensions
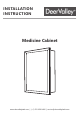
INSTRUCTIONS
(+1) 312-626-9466
www.deervalleybath.com
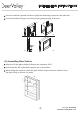
Make a rough opening and frame on all sides. Find the specific model dimensions to create
the rough opening (Fig 1).
Ensure the cabinet has at least 1" (25mm) clearance to the top of the faucet and at least 1"
from the ceiling (Fig 2).
Place the cabinet in the rough-in and ensure it is plumb and level (Fig 3).
Install a wood screw through the top mounting hole in the cabinet and screw it into the wall
stud as shown (Fig 4). Do not overtighten the screw.
(2) Assembling the Cabinet
Cabinet: 1 piece Tempered Glass
Shelves: 1 piece
Shelf Supports: 2 pieces
Screws/Thread
Plugs: 4 pieces each