
Setup guide

Dedicated Micros ©2006
81
DS2 Network Guide
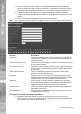
How to Congure the Webcam functionality
Any of the video inputs on the unit can be made available to be transmitted to a webserver via FTP.
These images can then be incorporated into a web page and accessed via a standard web browser.
This function gives users the opportunity to incorporate video images into their Corporate web site.
Examples of where this can be incorporated are:
Company that utilise the unit for their building security but also route some strategically placed
cameras to their intranet allowing employees access to the video, possible to view the car park.
Theme Parks that again use the unit for their site security but link some of the cameras to the
Internet site to allow potential visitors to gauge how busy the Park is and when they should visit.
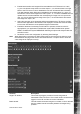
This section has been divided into:
Enabling the feature, identifying server information and enabling the cameras
Conguring the FTP session details.
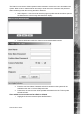
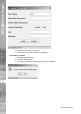
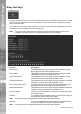
To enable and congure the webcam feature:
1. Select Network -> Webcam Set-up.
2. Enter the FTP Server details; this can be the IP address, URL or domain name of the
Server that will forward the images to the web pages. This link is usually provided by
the Internet Service Provider (ISP).
3. Enter the root directory on the FTP server where the les will be saved.
4. Enter the image directory information; this is the path within the root drive that will store
the images that are being sent via FTP to the Server.
5. Enter the prex information that will precede the image le when uploaded to the FTP
Server, an example is ‘cam_’ which would create a le name of cam_01.jpg.
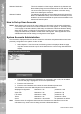
6. Enter the username and password to allow the les to be uploaded to the FTP Server,
this will be given to you by the Network Administrator.