
Setup guide


Dedicated Micros ©2006
67
DS2 Network Guide
Alternatively it is also possible to highlighted protected recordings and un-protect these so they can
be overwritten.
To protect existing recorded images:
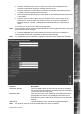
1. Select Alarms/VMD – Alarm Image Protect/Unprotect, If there are any existing protected
images these will be displayed within the protect image partition summary.
2. Enter the start and end time and date and select Protect Images to display the
corresponding recordings.
3. Highlight the recorded le in the protect image partition summary.
4. Enter the time period that images are to be protected in the protect image option or
select protect images indenitely for these never to be overwritten.
To unprotect existing protected images:
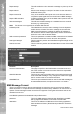
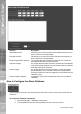
1. Select Alarms/VMD -> Alarm Zone.
2. Alarm recordings can be protected from being overwritten for a set period of time or
indenitely. Enter the time period in days that the alarms are to be protected or place a
tick in the box alongside indenitely.
3. Set the alarm entry timer in seconds, this is part of the advanced alarm feature and are
displayed when this feature is enabled.
4. Set the alarm exit timer in seconds, this is part of the advanced alarm feature and are
displayed when this feature is enabled.
5. Select the alarm zone to be congured from the drop down option (Zone 1 to Zone 32).
6. Enter an appropriate title to the alarm zone, this will be stored in the database (if
enabled), it is also possible to use the camera title for identication.
7. Enter the time period prior to the alarm that you wish to save along with the incident for
review with the incident, this time is in seconds.
8. Enter alarm duration in seconds; this is the time period where associated video will be
protected from being overwritten.
9. The zone alarm input can be an of the external alarms (direct or 485), any of the
congured VMD zones or any of the preset settings, select the appropriate alarm input
from the drop down list.
10. The Zone OR input allows you to congure a situation where an alarm received on
either of the zone alarm input or the zone OR input will force the unit go into alarm
mode and initiate pre-dened alarm actions, select the appropriate option from the drop
down list.
11. The zone AND input allows you to congure a situation where an alarm must be
received on both the zone alarm input and the zone AND input to force the Digital Sprite
2 to go into alarm mode, select the appropriate option from the drop down list.
12. The zone NOT input allows you to congure a situation where if an alarm is received
on the zone alarm input then an alarm must not be received on the zone NOT input to
force the unit into alarm mode which will initiate the alarm actions congured, select the
appropriate option from the drop down list.
13. Remember to save the conguration by selecting Save Settings!