
Setup guide


Dedicated Micros ©2006
65
DS2 Network Guide
prole This can be a number or name that has been congured on
the SMS Set-up page, this will be via the serial port or Ethernet
connection.
text This is the text message that will be sent to the remote viewer
informing the Operator of an incident and therefore should be
meaningful.
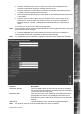
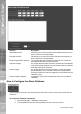
How to Congure E-mail Settings
The unit can automatically transmit and e-mail to an SMTP Server under numerous conditions,
including on start up of the unit, on receipt of an alarm, or camera failure.
This allows the unit to be installed in unmanned applications where a Remote Monitoring Station (or
Manager, etc) would be notied, by e-mail, if any of these conditions occur.
To congure the settings to allow e-mails to be transmitted:
1. Select Network -> E-mail.
2. The feature must be enabled to work. Click the ‘Enable E-mail’ checkbox to enable or
disable the feature.
3. Enter the connection prole; this can be Ethernet if the e-mail is to be transmitted over
the LAN or WAN or named prole if using a dial up connection.
4. Enter the IP address or the DNS name of the SMTP Server the e-mail will be sent to.
5. Enter the e-mail address that the SMTP server should forward the e-mail to.
6. If applicable enter the display name for the e-mail address.
7. Enter the e-mail address that the recipient is to reply to. This is only applicable if a reply
is required and MUST be lled in for this to happen.
8. If applicable enter the display name of the reply e-mail address.
9. It is possible to identify where the e-mail has be sent from. This is optional and if this is
left empty, the video server will use the system name & DNS name to create a sender
name.
Note: The unit can not receive e-mail replies but this must be a valid e-mail address for an SMTP
Server.
10. The unit can be forced to send an e-mail under numerous conditions including start up
of the unit, on alarm (this must also be enabled in Alarm Zone page), camera failure
and VMD/ACT activation. Place a tick against the actions that are applicable to your
systems functional requirements.
11. Place a tick in the e-mail log box to ensure ever e-mail transaction is added to the
system logs.
12. Save your conguration by selecting Save Settings!