
Setup guide

Dedicated Micros ©2006
59
DS2 Network Guide
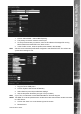
Report Startup Reporting This will send an alarm report when the unit starts up, this will
identify any system resets.
Dial Retry Time If the initial connection attempt fails then the unit will wait for
the specied time period before attempting to re-connect. If
using Multi-Ping, this will be the period between 30 second ping
transmissions.
Dial Limit This identies the number of times the unit will attempt to connect
to the remote alarm monitoring station after a failed attempt. A
setting of 0 identies no limit and the unit will continue to try and
connect until it is successful.
Alarm Telnet Server Port This species the network port number to use for reporting to the
alarm server. This is normally left at the default value.
ARC Ping This will send a single wake up ping across a network to a
specied ARC server. If no reply is received, the unit will wait for
the Dial Retry Time before sending another ping, until it reaches
the Dial Limit.
ARC Multi-Ping For use on a remote network with ISDN routers. The unit will send
30 seconds of ping to wake up all devices in the communication
chain, it will then wait for the Dial Retry Time before sending
another 30 second ping. It will do this for the Dial Limit.
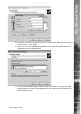
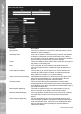
How to Congure FTP Settings for Archiving Images
The unit can archive images to a central FTP server or to the internal CD writer; this can be on
receipt of an alarm or VMD using a scheduled time to backup the video.
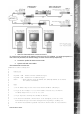
When using FTP in a multi-unit application this ensures that all les are stored in one central location
for each of the units, offering efcient le management and easier review capabilities.
Note: It is also possible to archive images directly to the internal CD, refer to the Setup Guide for
full details on how to select download to CD for archiving.
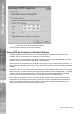
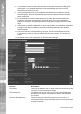
To congure the FTP information:
1. Select Network -> FTP Events Download.
2. Enter the information on the FTP Server; this can be an IP address, full URL or name of
the server.
3. It is possible to identify the FTP control port, the default for networks is usually port 21
however if this port number is not supported on the network, then this option allows you
allocate an unused port number.
4. Enter the directory information where the images are to be stored, this should be a
name associated with the unit name for ease of retrieval.
5. For les to be saved to the FTP Server it is necessary to go through an authentication
process to gain access to the server, enter the username and password.
6. It is possible to enable the unit to start an FTP download when an active Ethernet
connection is detected.
Note: As the unit always has a permanent network connection the Active Ethernet option means
when the Network port identies a change in state of the Ethernet link (down to up), for
example when the unit is reset or the network cable is unplugged then re-connected.
7. If the FTP download is to happen automatically at a set time each day, enter the
required time in the scheduled time option.