
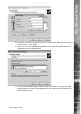
Setup guide

Dedicated Micros ©2006
54
DS2 Network Guide
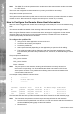
# -------------------
# Profiles Table List
# -------------------
# <Username & Profile Label> <Password> <Port> <Phone No> <IP Address Range> <Subnet Mask>
#
username password PPP_Link2 1234567890 10.0.0.1 255.255.255.0
username password PPP_Link1 1234567890 10.0.0.1 255.255.255.0
dm password Ether1 1234567890 10.0.0.1 255.255.255.0
# End of file
Note: Any lines marked with a # are comment lines and will be ignored by the system.
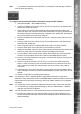
Connections are specied by the proles list table at the bottom of the le. Here it is below in a table
for easier reading:
Username & Prole Label Password Port Phone No IP Address Range Subnet Mask
username password PPP_Link2 1234567890 10.0.0.1 255.255.255.0
username password PPP_Link1 1234567890 10.0.0.1 255.255.255.0
dm password Ether1 1234567890 10.0.0.1 255.255.255.0
To set up PPP as a backup to Network Alarms, the PPP table settings need to be edited:
Username & Prole Label Password Port Phone No IP Address Range Subnet Mask
username password PPP_Link2 1234567890 10.0.0.1 255.255.255.0
dialout secret PPP_Link1 12345 172.16.100.240 255.255.0.0
dm password Ether1 1234567890 10.0.0.1 255.255.255.0
4. The PPP_Link1 connection, which is the link used for dial out on alarm, has been
changed. Change the username and password to anything, as long as it is unique in
the list.
5. Enter the phone number that the unit has to dial, along with an IP range and subnet
mask.
Note:
The IP address in the table needs to be the address used by the PC within the target
network. For example, the unit has a local network address range of 192.168.*.* but
the PPP is using 172.16.*.*. The unit PPP range in the proles le must be the same as
whatever is being used on the target network (in this case 172.16.*.*). The unit network
address should be on a different range to the PPP addressing scheme or else the unit will
see the alarm target is on the same LAN segment, and try to send the alarm via Ethernet,
even when the PPP session is established.
6. Save the edited PROFILES le back to the unit.
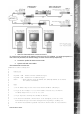
SET THE CONDITIONS UNDER WHICH THE UNIT WILL DIAL OUT
The unit now has the information it requires to establish a connection, either through the network
or over an ISDN link to an external PC. The next step is to set up the hardware that will make the
connection.