
Setup guide

Dedicated Micros ©2006
53
DS2 Network Guide
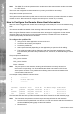
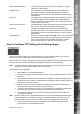
CREATE A CONNECTION PROFILE
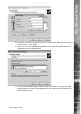
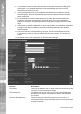
1. Use FTP client software to connect to the unit.
To connect to the unit type the IP address of the unit in the FTP software, you will be prompted for a
user name and password; the default settings for these are dm and ftp respectively.
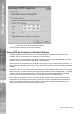
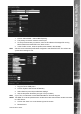
2. Locate the ‘prole’ le within the /etc folder.
3. Open the le with a text editor.
The standard le looks like this:
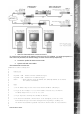
# DS2 Profiles Table 23-January-2004
#
# Profile list
# ------------
#
# PPP_Link1 = COM2 - Default alarm dial communication port.
# PPP_Link2 = COM1 - Default dial in communication port.
# Ether1 = Alarm connection across an Ethernet Port (Entering Ethernet as the Profile
# will connect over Ethernet)
#
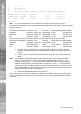
# Rules
# -----
# 1) The IP address range is that of the remote network the
DS2 is connecting to.
#
# 2) IF you set the IP range to 10.0.0.50 with a subnet of 255.255.255.0, the HOST PC
# IP address range will be 10.0.0.51 to 10.0.0.254
#
# 3) If you only wish to dialling into the
DS2, the Phone No.
#
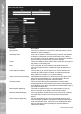
# 4) The first field <Username & Profile Label> is the description you will use in the
# Alarm Connection Page as the Profile description for the primary & secondary call.
# The Profile label/username & password listed in the Profiles Table are “Case Sensitive”.
#
#